Acer S5201 User Manual - Page 17
Getting Started, Connecting the Projector
 |
View all Acer S5201 manuals
Add to My Manuals
Save this manual to your list of manuals |
Page 17 highlights
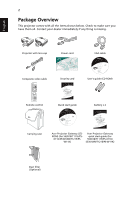
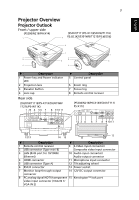
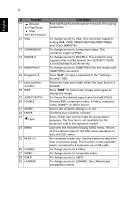
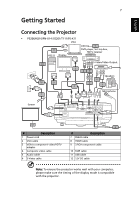
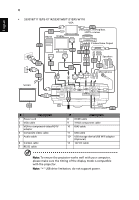
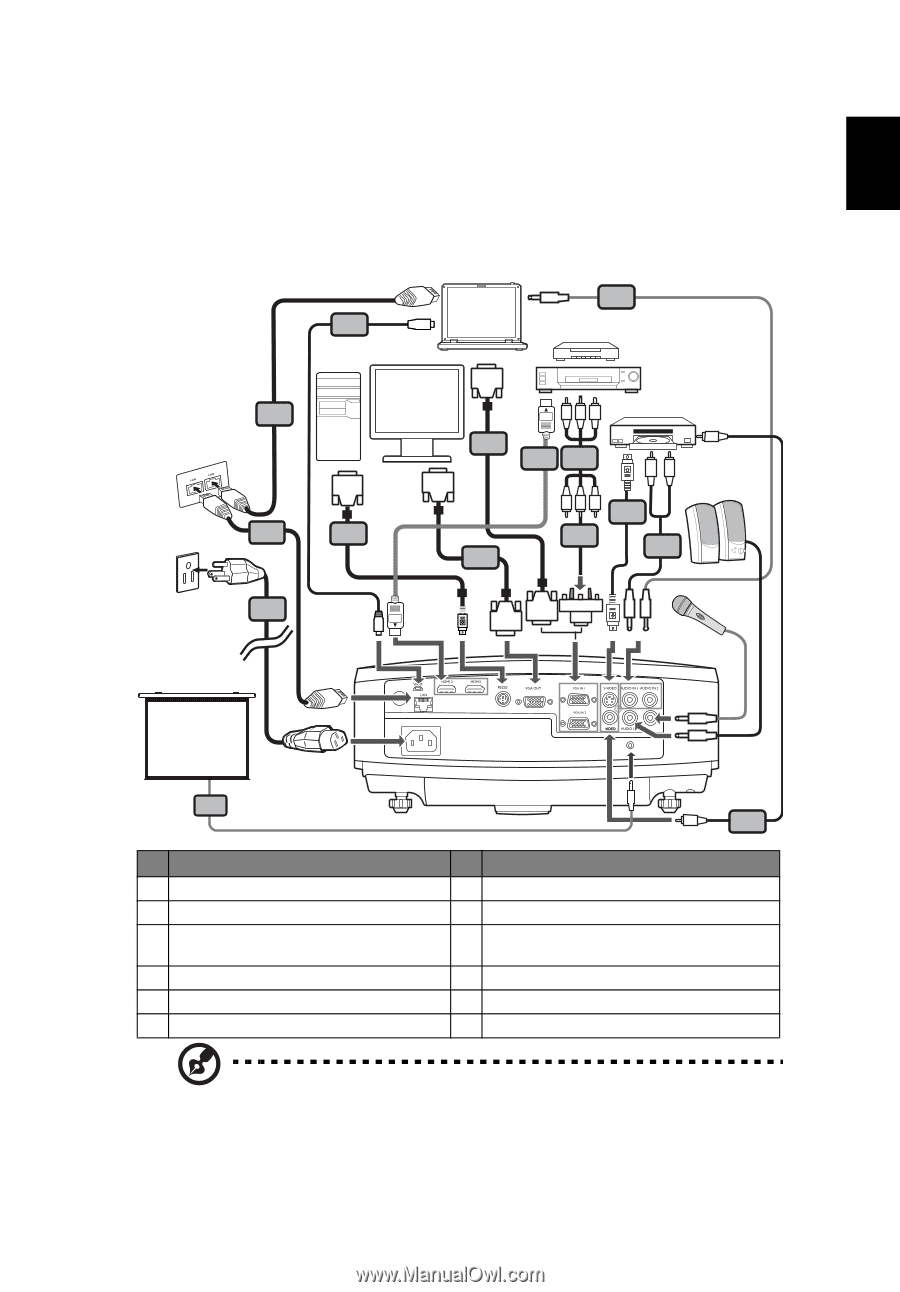
English Y 7 Getting Started Connecting the Projector • P5206/N216/PN-X14/S5201/T111/PS-X11 VGA 11 RS232 USB Display 10 5 DVD player, Set-top box, HDTV receiver D-Sub S-Video/Video Output RB G RS232 10 7 2 D-Sub 2 89 RB G 6 3 W R Speakers 5 Microphone 1 D-Sub HDTV adapter D-Sub Screen MIC. DC OUT USB Y 12 4 # Description 1 Power cord 2 VGA cable 3 VGA to component video/HDTV adapter 4 Composite video cable 5 Audio cable 6 S-Video cable # Description 7 RS232 cable 8 HDMI cable 9 3 RCA component cable 10 RJ45 cable 11 USB cable 12 12V DC cable Note: To ensure the projector works well with your computer, please make sure the timing of the display mode is compatible with the projector.
-
 1
1 -
2
-
3
-
4
-
5
-
6
-
7
-
8
-
9
-
10
-
11
-
 12
12 -
 13
13 -
 14
14 -
 15
15 -
 16
16 -
 17
17 -
 18
18 -
 19
19 -
 20
20 -
 21
21 -
 22
22 -
23
-
24
-
25
-
26
-
27
-
28
-
29
-
30
-
31
-
32
-
33
-
34
-
35
-
36
-
37
-
38
-
39
-
40
-
41
-
42
-
43
-
44
-
45
-
46
-
47
-
48
-
49
-
50
-
51
-
52
-
53
-
54
-
55
-
56
-
57
-
58
-
59
-
60
-
61
-
62
-
63
-
64
-
65
 |
 |
7
English
Getting Started
Connecting the Projector
•
P5206/N216/PN-X14
/
S5201/T111/PS-X11
Note:
To ensure the projector works well with your computer,
please make sure the timing of the display mode is compatible
with the projector.
#
Description
#
Description
1
Power cord
7
RS232 cable
2
VGA cable
8
HDMI cable
3
VGA to component video/HDTV
adapter
9
3 RCA component cable
4
Composite video cable
10
RJ45 cable
5
Audio cable
11
USB cable
6
S-Video cable
12
12V DC cable
MIC.
RS232
RBG
RBG
HDTV adapter
D-Sub
D-Sub
7
D-Sub
D-Sub
2
6
4
5
2
1
Y
5
R
W
9
8
3
Y
10
10
11
USB
USB
DC OUT
12
DVD player, Set-top box,
HDTV receiver
VGA
RS232
S-Video/Video Output
Speakers
Display
Microphone
Screen