Acer S5201 User Manual - Page 50
Ceiling Mount Installation
 |
View all Acer S5201 manuals
Add to My Manuals
Save this manual to your list of manuals |
Page 50 highlights
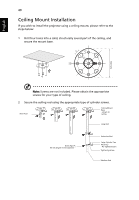
English 8.4 mm 2 0 40 Ceiling Mount Installation If you wish to install the projector using a ceiling mount, please refer to the steps below: 1 Drill four holes into a solid, structurally sound part of the ceiling, and secure the mount base. mm mm13 m4m9.9 130 mm Note: Screws are not included. Please obtain the appropriate screws for your type of ceiling. 2 Secure the ceiling rod using the appropriate type of cylinder screws. Short Rod Ceiling Mount Base - Attach to ceiling Long Rod Screw Type A 50 mm length / 8 mm diameter - Extension Rod Large Cylinder Cap Allen Key - For tighten/loosen Tightening Screw Medium Rod
-
 1
1 -
2
-
3
-
4
-
5
-
6
-
7
-
8
-
9
-
10
-
11
-
12
-
13
-
14
-
15
-
16
-
17
-
18
-
19
-
20
-
21
-
22
-
23
-
24
-
25
-
26
-
27
-
28
-
29
-
30
-
31
-
32
-
33
-
34
-
35
-
36
-
37
-
38
-
39
-
40
-
41
-
42
-
43
-
44
-
 45
45 -
 46
46 -
 47
47 -
 48
48 -
 49
49 -
 50
50 -
 51
51 -
 52
52 -
 53
53 -
 54
54 -
 55
55 -
56
-
57
-
58
-
59
-
60
-
61
-
62
-
63
-
64
-
65
 |
 |

40
English
Ceiling Mount Installation
If you wish to install the projector using a ceiling mount, please refer to the
steps below:
1
Drill four holes into a solid, structurally sound part of the ceiling, and
secure the mount base.
Note:
Screws are not included. Please obtain the appropriate
screws for your type of ceiling.
2
Secure the ceiling rod using the appropriate type of cylinder screws.
20
mm
13
mm
8.4
mm
130 mm
49.9
mm
Short Rod
Screw Type A
50 mm length / 8 mm diameter -
Ceiling Mount
Base
- Attach to
ceiling
Long Rod
Extension Rod
Allen Key
- For tighten/loosen
Tightening Screw
Medium Rod
Large Cylinder Cap