Acer TravelMate P2510-MG User Manual - Page 13
Base view
 |
View all Acer TravelMate P2510-MG manuals
Add to My Manuals
Save this manual to your list of manuals |
Page 13 highlights
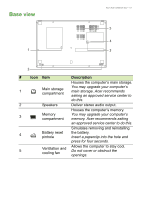
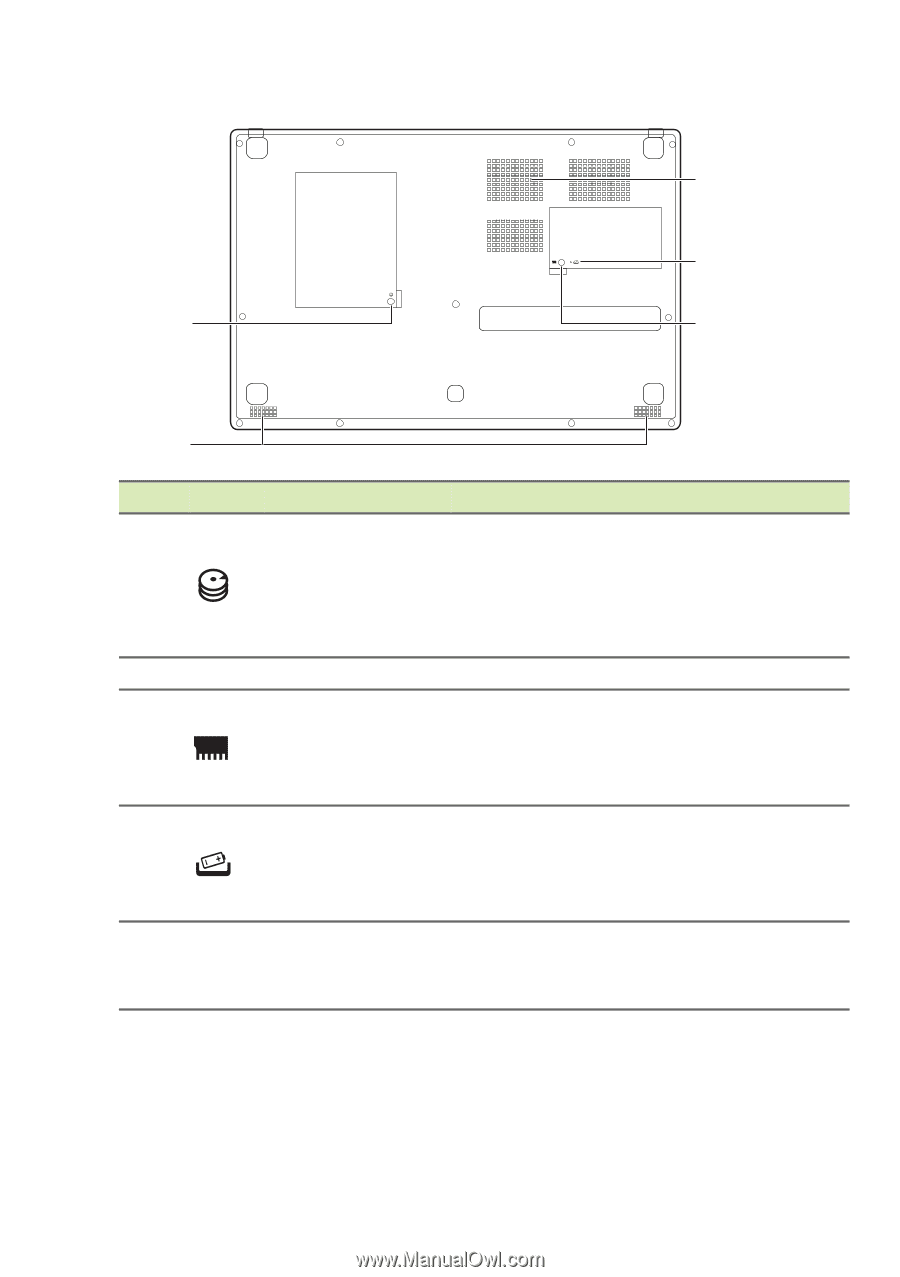
Base view 1 Your Acer notebook tour - 13 5 4 3 2 # Icon Item Description Houses the computer's main storage. 1 Main storage compartment You may upgrade your computer's main storage. Acer recommends asking an approved service center to do this. 2 Speakers Deliver stereo audio output. Houses the computer's memory. 3 Memory compartment You may upgrade your computer's memory. Acer recommends asking an approved service center to do this. Simulates removing and reinstalling 4 Battery reset pinhole the battery. Insert a paperclip into the hole and press for four seconds. 5 Ventilation and cooling fan Allows the computer to stay cool. Do not cover or obstruct the openings.
-
 1
1 -
2
-
3
-
4
-
5
-
6
-
7
-
 8
8 -
 9
9 -
 10
10 -
 11
11 -
 12
12 -
 13
13 -
 14
14 -
 15
15 -
 16
16 -
 17
17 -
 18
18 -
19
-
20
-
21
-
22
-
23
-
24
-
25
-
26
-
27
-
28
-
29
-
30
-
31
-
32
-
33
-
34
-
35
-
36
-
37
-
38
-
39
-
40
-
41
-
42
-
43
-
44
-
45
-
46
-
47
-
48
-
49
-
50
-
51
-
52
-
53
-
54
-
55
-
56
-
57
-
58
-
59
-
60
-
61
-
62
-
63
-
64
-
65
-
66
-
67
-
68
-
69
-
70
-
71
-
72
-
73
-
74
-
75
-
76
-
77
-
78
-
79
-
80
-
81
-
82
-
83
 |
 |
Your Acer notebook tour - 13
Base view
1
2
5
4
3
#
Icon
Item
Description
1
Main storage
compartment
Houses the computer’s main storage.
You may upgrade your computer’s
main storage. Acer recommends
asking an approved service center to
do this.
2
Speakers
Deliver stereo audio output.
3
Memory
compartment
Houses the computer’s memory.
You may upgrade your computer’s
memory. Acer recommends asking
an approved service center to do this.
4
Battery reset
pinhole
Simulates removing and reinstalling
the battery.
Insert a paperclip into the hole and
press for four seconds.
5
Ventilation and
cooling fan
Allows the computer to stay cool.
Do not cover or obstruct the
openings.