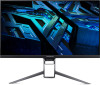
Acer X32FP User Manual
Acer X32FP Manual
 |
View all Acer X32FP manuals
Add to My Manuals
Save this manual to your list of manuals |
Acer X32FP manual content summary:
- Acer X32FP | User Manual - Page 1
Acer LCD Monitor User Guide - Acer X32FP | User Manual - Page 2
. All Rights Reserved. Acer LCD Monitor User's Guide Original Issue: 05/2022 Changes may be made periodically to the information in this publication without obligation to notify any person of such revisions or changes. Such changes will be incorporated in new editions of this manual or supplementary - Acer X32FP | User Manual - Page 3
following are normal with the LCD monitor and do not indicate a problem. • Due to the nature of the fluorescent light, the screen safety and comfort Safety instructions Read these instructions carefully. Keep this document for future reference. Follow all warnings and instructions marked on the - Acer X32FP | User Manual - Page 4
power from the equipment, be sure to unplug the power cord from the electrical outlet. Safe listening To protect your hearing, follow these instructions. • Gradually increase the volume until you can hear it clearly and comfortably and without distortion. • After setting the volume level, do not - Acer X32FP | User Manual - Page 5
or removing covers may expose you to dangerous voltage points or other risks. Refer all servicing to qualified service personnel. Unplug this product from the wall outlet and refer servicing to qualified service personnel when: • the power cord or plug is damaged, cut or frayed • liquid was spilled - Acer X32FP | User Manual - Page 6
service • the product does not operate normally after following the operating instructions Note: Adjust only those controls that are covered by the operating instructions in minimizing the burden placed on the environment. We at Acer are very conscious of the environmental effects of our business and - Acer X32FP | User Manual - Page 7
information about where you can drop off your waste equipment for recycling, please contact your local office,your household waste disposal service or the shop where you purchased the product. LCD pixel statement The LCD unit is produced with high-precision manufacturing techniques. Nevertheless - Acer X32FP | User Manual - Page 8
• stiffness or tightness • coldness or weakness If you have these symptoms, or any other recurring or persistent discomfort and/ or pain related to computer use, consult a physician immediately and inform your company's health and safety department. The following section provides tips for more - Acer X32FP | User Manual - Page 9
and productive: • Take short breaks regularly and often. • Perform some stretching exercises. • Breathe fresh air as often as possible. • Exercise regularly and maintain a healthy body. Acer monitor is purposed for video and visual display of information obtained from electronic devices. ix - Acer X32FP | User Manual - Page 10
Safety instructions iii Cleaning your monitor iii Connecting/disconnecting the device iii Accessibility...iv Safe listening...iv Warnings...iv Using electrical power iv Product servicing...v On/Off the Monitor 11 Control Panel 12 On Screen Display (OSD) Menu 13 Troubleshooting 24 x - Acer X32FP | User Manual - Page 11
, and save the packing materials in case you need to ship or transport the monitor in the future. LCD monitor Quick start guide Adapter AC Power cord Predator X32 FP Quick Guide USB-A to USB-B cable (optional) Headset Hook DP cable (optional) HDMI cable (optional) USB-C cable (optional) 1 - Acer X32FP | User Manual - Page 12
English Adjusting the viewing angle To optimize the viewing experience, you can adjust the tilt or height of the monitor by holding the left and right sides of the monitor. The tilt can be adjusted to a 35-degree angle upwards or a 5-degree angle downwards. 35 5 The rotary slide on the base - Acer X32FP | User Manual - Page 13
mode back to "on" is around 3 seconds (Auto Source off). Display Data Channel (DDC) To make installation easier, so long as your system supports the DDC protocol, the monitor is able to plug-and-play. The DDC is a communication protocol through which the monitor automatically informs the host system - Acer X32FP | User Manual - Page 14
English Connector pin assignment 19-Pin Color Display Signal Cable* PIN Meaning PIN 1 TMDS Data2 + 11 2 TMDS Data2 Shield 12 3 TMDS Data2 - 13 4 TMDS Data1 + 14 5 TMDS Data1 Shield 15 6 TMDS Data1 - 16 7 TMDS Data0 + 17 8 TMDS Data0 Shield 18 9 TMDS Data 0- 19 10 - Acer X32FP | User Manual - Page 15
9-Pin USB 3.0 Type B Cable PIN Meaning 1 VBUS 2 D- 3 D+ 4 GND 5 StdA_SSTX- 20-Pin Color Display Signal Cable* PIN Meaning 1 Lane 0 (+) 2 Ground 3 Lane 0 (-) 4 Lane 1 (+) 5 Ground 6 Lane 1 (-) 7 Lane 2 (+) 8 Ground 9 Lane 2 (-) 10 Lane 3 (+) *only for certain - Acer X32FP | User Manual - Page 16
60 Hz 60 Hz 60 Hz 60 Hz 120 Hz 144 Hz 60* Hz 120 Hz 144 Hz 160 Hz Note: USB Type-C: 3840x2160 @160Hz, supporting FreeSync Premium Pro and HDR technology. DP: 3840x2160 @160Hz, supporting FreeSync Premium Pro and HDR technology. HDMI1/HDMI2/HDMI3/HDMI4: 3840x2160 @160Hz - Acer X32FP | User Manual - Page 17
English Removing the Securing Strap Remove the securing strap from the rear side of the monitor before adjusting the height of the monitor. Securing Strap 7 - Acer X32FP | User Manual - Page 18
English Setting Up the Monitor Installing the headphone hook The supplied headphone hook can hold your headset on the rear of the monitor. Follow the steps below to install the headphone hook onto the monitor. 1. Align the headphone hook with the top of the stand. 2. Press the hook down vertically - Acer X32FP | User Manual - Page 19
English Connecting the Monitor to Your Computer Note: Before making connections, make sure that the power for all the connected equipment is off. Note: If you want to move the monitor, hold the bottom side of the monitor. Lifting up the monitor by holding its base may damage the monitor. Follow the - Acer X32FP | User Manual - Page 20
English Using the Monitor as a USB Hub To use the monitor as a USB hub, you need to connect the monitor to your computer using the supplied USB-A to USB-B cable or USB-C cable. 1. Connect the supplied USB-A to USB-B cable or USB-C cable to your computer according to your applications. Note: If you - Acer X32FP | User Manual - Page 21
English Note: Transmitting the 4K 160 signal via one HDMI 2.1/DP 1.4/Type-C port requires DSC (Display Stream Compression) functionality. If your computer's USB-C port does not have DP-Alt, please connect the HDMI/DP+USB-B to computer 1 and HDMI/DP+USB-C to computer 2. Powering On/Off the Monitor - Acer X32FP | User Manual - Page 22
English Control Panel The four buttons and a small joystick located on the left side of the rear panel can be used to control and configure the monitor. 1 2 3 4 5 1 Power Button • Turns the monitor on/off. 2 Hot Key 1 • Opens the OSD portal. • When the OSD portal is opened, press to enter the - Acer X32FP | User Manual - Page 23
English On Screen Display (OSD) Menu Note: The following content is for general reference only. Actual product specifications may vary. The OSD (On Screen Display) menu can be used to adjust the monitor's settings. You can use the joystick or hot keys on the rear panel of the monitor to access - Acer X32FP | User Manual - Page 24
English Hot key 1 (default: Standard mode) Select Mode to view more setting options. The options include: Action, Racing, Sports, User, Standard, ECO, Graphics, and HDR. Hot key 2 (default: Brightness) Select Brightness and then adjust the brightness of the monitor. Hot key 3 (default: HDMI1) - Acer X32FP | User Manual - Page 25
English Main OSD menu The main OSD menu lists all setting options that allow users to make adjustments to the monitor. To open the main OSD menu, select Menu in the OSD portal. Shortcut keys The OSD menu features three shortcut keys at right side of each sub-menu page. i- • ii - : Opens the - Acer X32FP | User Manual - Page 26
English On). Default: Off. • HDR: Sets the High Dynamic Range function (Off / Auto). Default: Off. Note: When HDR is set to Auto: 1. If the input source content is in SDR, the brightness of the monitor is configurable. If the input source content is in HDR, the brightness of the monitor will be - Acer X32FP | User Manual - Page 27
English The setting options include: • Gamma: Adjusts the mid-tone contrast of the monitor (1.8 / 2.0 / 2.2 / 2.4 / 2.6). Default: 2.2. • Color Temp.: Adjusts the color temperature of the monitor (Warm / Normal / Cool / Low Blue Light / User). Default: Warm. • R/G/B Gain: Adjusts R/G/B gain of the - Acer X32FP | User Manual - Page 28
monitor to make the pixels transition colors faster (Off / Normal / Extreme). Default: Normal. • FreeSync Premium Pro: Enables/Disables the FreeSync Premium Pro technology which is supported by AMD's graphic cards (Off / On). Default: On. 18 - Acer X32FP | User Manual - Page 29
. 2. If FreeSync Premium Pro is set to Off, users can set Ultra-Low Latency to Off or On. 3. Ultra-Low Latency does not support the resolutions lower than 800x600 and the V-Frequency lower than 48Hz. • Adaptive Dimming: Activates backligh adaptive dimming to synchronize with content brightness of - Acer X32FP | User Manual - Page 30
English Adjusting the OSD settings The setting options include: • Language: Changes the OSD menu language. Default: English. • OSD timeout: Sets the number of seconds the OSD menu is displayed before it automatically closes (10 to 120 seconds). Default: 10. • Transparency: Sets the transparency of - Acer X32FP | User Manual - Page 31
English The setting options include: • Input: Selects the input source (HDMI1 / HDMI2 / HDMI3 / HDMI4 / DP / DP ALT). Default: HDMI1. • Auto Source: Enables/Disables the monitor to automatically search for available input sources (Off / On). Default: On. • Wide Mode: Adjusts the aspect ratio of the - Acer X32FP | User Manual - Page 32
transmission speed of the USB Type-C port will be downgraded to the USB 2.0 specification, which allows the DP Alt (DisplayPort Alternate) mode to support resolution 3840x2160 @160Hz. 2. If USB 3.0 is set to On, the transmission speed of the USB Type-C port will comply with the USB 3.0 specification - Acer X32FP | User Manual - Page 33
English Information The setting options include: • Reset All Settings: Resets the OSD menu to its default settings. • Exit: Exits the OSD menu. Save Settings to... (for User Mode only) The Save Settings to... option will appear when the monitor is set to the User mode. It allows you to set up three - Acer X32FP | User Manual - Page 34
Before sending your LCD monitor for servicing, please check the troubleshooting list below to see if you can self-diagnose the problem. HDMI1 / HDMI2 / HDMI3 / HDMI4 / DP / DP Alt Mode Problem LED status Remedy No picture visible Blue Using the OSD menu, adjust brightness and contrast - Acer X32FP | User Manual - Page 35
(MI), Italy Tel: +39-02-939-921 ,Fax: +39-02 9399-2913 www.acer.it Product: LCD Monitor Trade Name: ACER Model Number: X32 SKU Number: X32 xxxxxxx ("x" = 0~9, a ~ z, A ~ Z, or blank) We, Acer Incorporated, hereby declare under our sole responsibility that the product described above is in - Acer X32FP | User Manual - Page 36
S. A. Tel : 254-298-4000 Fax : 254-298-4147 www.acer.com Federal Communications Commission Declaration of Conformity This device complies with Part 15 0~9, a ~ z, A ~ Z or Blank) Name of Responsible Party: Acer America Corporation Address of Responsible Party: 333 West San Carlos St. Suite 1500 - Acer X32FP | User Manual - Page 37
Product Infomation for EU Energy Regulatory Compliance R35877 27
-
 1
1 -
 2
2 -
 3
3 -
 4
4 -
 5
5 -
 6
6 -
 7
7 -
8
-
9
-
10
-
11
-
12
-
13
-
14
-
15
-
16
-
17
-
18
-
19
-
20
-
21
-
22
-
23
-
24
-
25
-
26
-
27
-
28
-
29
-
30
-
31
-
32
-
33
-
34
-
35
-
36
-
37
 |
 |

Acer LCD Monitor
User Guide