Acer XF250QB User Manual - Page 20
Installation
 |
View all Acer XF250QB manuals
Add to My Manuals
Save this manual to your list of manuals |
Page 20 highlights
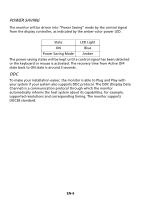
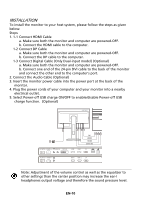
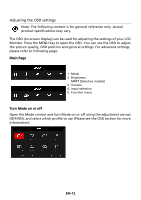
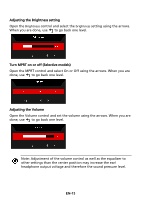
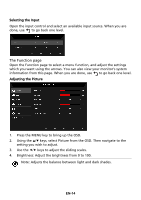
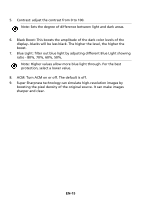
INSTALLATION To install the monitor to your host system, please follow the steps as given below: Steps 1. 1-1 Connect HDMI Cable a. Make sure both the monitor and computer are powered-OFF. b. Connect the HDMI cable to the computer. 1-2 Connect DP Cable a. Make sure both the monitor and computer are powered-OFF. b. Connect the DP cable to the computer. 1-3 Connect Digital Cable (Only Dual-input model) (Optional) a. Make sure both the monitor and computer are powered-OFF. b. Connect one end of the 24-pin DVI cable to the back of the monitor and connect the other end to the computer's port. 2. Connect the Audio Cable (Optional) 3. Insert the monitor power cable into the power port at the back of the monitor. 4. Plug the power cords of your computer and your monitor into a nearby electrical outlet. 5. Select Power-off USB charge ON/OFF to enable/disable Power-off USB charge function. (Optional) AC SWITCH POWER AUDIO IN DVI-D IN HDMI HDMI DP HDMI HDMI DVI-D IN DP AC SWITCH POWER HDMI 1 HDMI 2 DP Note: Adjustment of the volume control as well as the equalizer to other settings than the center position may increase the ear-/ headphones output voltage and therefore the sound pressure level. EN-10
-
 1
1 -
2
-
3
-
4
-
5
-
6
-
7
-
8
-
9
-
10
-
11
-
12
-
13
-
14
-
 15
15 -
 16
16 -
 17
17 -
 18
18 -
 19
19 -
 20
20 -
 21
21 -
 22
22 -
 23
23 -
 24
24 -
 25
25 -
26
-
27
-
28
-
29
-
30
-
31
-
32
-
33
-
34
 |
 |