Actiontec HPE400T Kit User Manual - Page 40
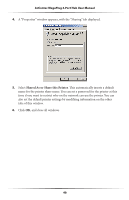
A System Settings Change window appears. Click, The Identification tab
 |
View all Actiontec HPE400T Kit manuals
Add to My Manuals
Save this manual to your list of manuals |
Page 40 highlights
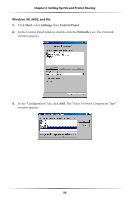
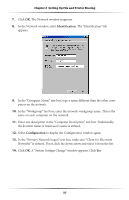
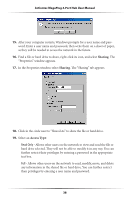
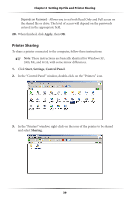
Chapter 6 Setting Up File and Printer Sharing 7. Click OK. The Network window reappears. 8. In the Network window, select Identification. The "Identification" tab appears. 9. In the "Computer Name" text box, type a name different than the other computers on the network. 10. In the "Workgroup" text box, enter the network workgroup name. This is the same on each computer on the network. 11. Enter any description in the "Computer Description" text box. Traditionally, the location name or main user's name is entered. 12. Select Configuration to display the Configuration window again. 13. In the "Primary Network Logon" text box, make sure "Client for Microsoft Networks" is entered. If not, click the down arrow and select it from the list. 14. Click OK. A "System Settings Change" window appears. Click Yes. 37
-
 1
1 -
2
-
3
-
4
-
5
-
6
-
7
-
8
-
9
-
10
-
11
-
12
-
13
-
14
-
15
-
16
-
17
-
18
-
19
-
20
-
21
-
22
-
23
-
24
-
25
-
26
-
27
-
28
-
29
-
30
-
31
-
32
-
33
-
34
-
 35
35 -
 36
36 -
 37
37 -
 38
38 -
 39
39 -
 40
40 -
 41
41 -
 42
42 -
 43
43 -
 44
44 -
 45
45 -
46
-
47
-
48
-
49
-
50
-
51
-
52
-
53
-
54
-
55
 |
 |
