Adaptec 5325301553 Quick Start Guide - Page 3
Connecting to Your Network, Powering On the Server, Acquiring an IP Address, Initializing the Server
 |
UPC - 753253015535
View all Adaptec 5325301553 manuals
Add to My Manuals
Save this manual to your list of manuals |
Page 3 highlights
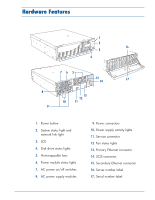
Connecting to Your Network Connect the server to a 10BaseT, 100BaseTX, or 1000BaseT network. Use one or both of the Ethernet cables provided starting with the primary Ethernet connector. Using both connectors offers advantages such as load balancing and failover. Note: If you use only one network connector, use the primary Ethernet connector marked '1' on the back of the server as shown in the section, "Hardware Features." Powering On the Server Turn on both power module switches on the back of the server. Then press the power button on the front of the server and hold it down until the LCD lights up. The LCD panel indicates boot and system status. When the system is ready, the server name displays. Acquiring an IP Address 1. Install NASManager from the User CD onto a client computer. 2. Launch NASManager. 3. In the NASManager window, locate the server by name (The default server name is SNAPnnnnnn, where nnnnnn is the server number of your server.) Note: If you do not have a DHCP server on your network, you must assign an IP address manually. In the NASManager window, select your server, then select Tools > Set IP Address. Enter a unique IP address, and click OK. When prompted, enter admin for the user name and admin for the password. Initializing the Server 1. Launch your browser and enter the Snap Server 14000 server's name or IP address. 2. Log in with default User Name admin and Password admin. 3. Complete setup with the Initial Setup Wizard. Note: To learn more about configuring the server, see the Administrator Guide and the online help.
-
 1
1 -
 2
2 -
 3
3 -
 4
4 -
 5
5 -
 6
6
 |
 |
