Adaptec 5325301580 Quick Start Guide - Page 6
Connecting to the Snap Server for the First Time
 |
UPC - 753253015801
View all Adaptec 5325301580 manuals
Add to My Manuals
Save this manual to your list of manuals |
Page 6 highlights
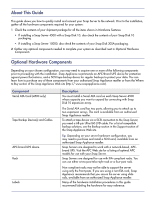
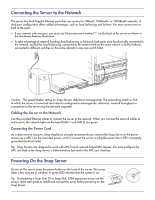
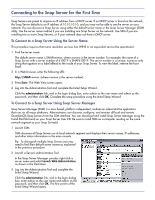
Connecting to the Snap Server for the First Time Snap Servers are preset to acquire an IP address from a DHCP server. If no DHCP server is found on the network, the Snap Server defaults to an IP address of 10.10.10.10, and you may not be able to see the server on your network. You can discover a Snap Server using either the default server name or the Snap Server Manager (SSM) utility. Use the server name method if you are installing one Snap Server on the network. Use SSM if you are installing two or more Snap Servers, or if your network does not have a DHCP server. To Connect to a Snap Server Using the Server Name This procedure requires that name resolution services (via WINS or an equivalent service) be operational. 1 Find the server name. The default server name is SNAPnnnnnn, where nnnnnn is the server number. For example, the name of a Snap Server with a server number of 610019 is SNAP610019. The server number is a unique, numerics-only string that appears on a label affixed to the inside of your Snap Server. To view the label, remove the front bezel. 2 In a Web browser, enter the following URL: http://SNAPnnnnnn (where nnnnnn is the server number) 3 Press Enter. The Web View screen opens. 4 Log into the Administration Tool and complete the Initial Setup Wizard. Click the administration link, and in the login dialog box, enter admin as the user name and admin as the password, and then click OK. Complete the setup procedure using the Initial Setup Wizard. To Connect to a Snap Server Using Snap Server Manager Snap Server Manager (SSM) is a Java-based, platform-independent, multiserver administrative application that runs on all major platforms. Administrators can discover, configure, and monitor all local and remote GuardianOS Snap Servers from the SSM interface. You can download and install Snap Server Manager using the Install.html file found on your Snap Server User CD. Be sure to install SSM on a computer residing on the same network segment as your Snap Server(s). 1 Launch SSM. SSM discovers all Snap Servers on its local network segment and displays their server names, IP addresses, and other status information in the main console. Tip To distinguish multiple Snap Servers you may need to find their default server names as explained in the previous procedure. 2 Launch a Server's Administration Tool. In the Snap Server Manager console, right-click a server name and select Launch Web Administration, as shown in the illustration. 3 Log into the Administration Tool and complete the Initial Setup Wizard. Click the administration link, and in the login dialog box, enter admin as the user name and admin as the password, and then click OK. The first screen of the Initial Setup Wizard opens.
-
 1
1 -
 2
2 -
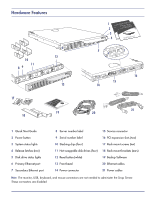 3
3 -
 4
4 -
 5
5 -
 6
6 -
 7
7
 |
 |
