Airlink AICAP650 User Manual - Page 7
Getting Started - manual
 |
View all Airlink AICAP650 manuals
Add to My Manuals
Save this manual to your list of manuals |
Page 7 highlights
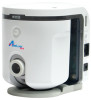
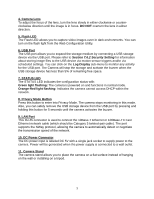
2. Getting Started Note: Before using the IP Camera, you'll need to perform the following tasks: 1. Connect the IP Camera to your network. 2. Install the Setup Wizard. 3. Configure the IP Camera using the Setup Wizard. Please follow the steps in this Manual carefully to ensure proper setup of the IP Camera. Caution: The IP Camera is designed for indoor use only. Direct exposure to sunlight may cause permanent damage to the CMOS sensor. When operating in extremely bright environment, an iris lens or sun visor is recommended to protect the IP Camera. Step 1 Align the camera stand with the bottom part of the camera. Then, secure the camera stand with the screw. 7
-
 1
1 -
 2
2 -
 3
3 -
 4
4 -
 5
5 -
 6
6 -
 7
7 -
 8
8 -
 9
9 -
 10
10 -
 11
11 -
 12
12 -
13
-
14
-
15
-
16
-
17
-
18
-
19
-
20
-
21
-
22
-
23
-
24
-
25
-
26
-
27
-
28
-
29
-
30
-
31
-
32
-
33
-
34
-
35
-
36
-
37
-
38
-
39
-
40
-
41
-
42
-
43
-
44
-
45
-
46
-
47
-
48
-
49
-
50
-
51
-
52
-
53
-
54
-
55
-
56
-
57
-
58
-
59
-
60
-
61
-
62
-
63
-
64
-
65
-
66
-
67
-
68
-
69
-
70
-
71
-
72
-
73
-
74
-
75
-
76
-
77
-
78
-
79
-
80
-
81
 |
 |

7
2. Getting Started
Note:
Before using the IP Camera, you’ll need to perform the following tasks:
1. Connect the IP Camera to your network.
2. Install the Setup Wizard.
3. Configure the IP Camera using the Setup Wizard.
Please follow the steps in this Manual carefully to ensure proper setup of the IP Camera.
Caution:
The IP Camera is designed for indoor use only. Direct exposure to sunlight
may cause permanent damage to the CMOS sensor. When operating in extremely
bright environment, an iris lens or sun visor is recommended to protect the IP Camera.
Step 1
Align the camera stand with the bottom part of the camera. Then, secure the
camera stand with the screw.