Akai MPKMINI Quick Start Guide - Page 5
Software Editor - mpk mini
 |
View all Akai MPKMINI manuals
Add to My Manuals
Save this manual to your list of manuals |
Page 5 highlights
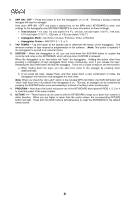
SOFTWARE EDITOR OPENING THE EDITOR Always connect the MPK mini to your computer before opening the software editor. After opening the software editor, you will need to select the MPK mini from the drop-down menu on the opening screen and click "Done." y For Mac or Windows Vista users, it will be listed as Akai MPK mini. y For Windows XP users, it will be listed as USB Audio Device. (If you have other USB audio devices connected to your computer, which may have identical names, you may need to try selecting each one until the MPK mini is recognized.) IMPORTANT!: The first time you use the software editor, even if the correct device is already shown in the drop-down menu, you still need to click on the menu and select the device. (You will also need to do this if you move your files to a new location.) In future sessions, though, you can simply click "Done" if the correct device is shown in this window. PRESETS LOADING & SAVING PRESETS The editor lets you edit, save, or load presets for the MPK mini on your computer. 1. GET PRESET - Click a button to select the number of a preset currently on the MPK mini (1-4). When you select it, its settings will be shown on the software interface. 2. PRESET # - Click on this field to select the number that the currently shown preset will use if you upload it to the MPK mini (by clicking UPLOAD). Note: When you save a preset, the current PRESET # will be saved with it. When you load that preset later, the PRESET # field will be updated with that number. If you want to change the preset number before uploading it to the MPK mini, simply select a new PRESET # before clicking UPLOAD. 3. UPLOAD - Click this button to send the TO COPY A PRESET: currently shown preset to the MPK mini. The number of this preset is determined by the PRESET # field. 4. SAVE PRESET - Click this button to save the currently shown preset to your computer. 1. Load the preset you want to copy from the MPK mini by clicking the GET PRESET button. 2. Set the preset you want to copy it to on the MPK mini by clicking PRESET # field and selecting it. 3. Click UPLOAD to send the copied preset to the MPK mini. 5. LOAD PRESET - Click this button to load a saved preset from your computer. Once it loads, you will see its settings in the software interface. 3
-
 1
1 -
 2
2 -
 3
3 -
 4
4 -
 5
5 -
 6
6 -
 7
7 -
 8
8 -
 9
9 -
 10
10
 |
 |