Alesis CompactKit 7 User Guide - Page 5
Rear Panel - 7 pad
 |
View all Alesis CompactKit 7 manuals
Add to My Manuals
Save this manual to your list of manuals |
Page 5 highlights
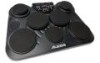
19. Volume: Press this button, and then use the Value Down/Up buttons to adjust the volume of a specific pad. See Operation > Kits > Editing to learn more. 20. Pan: Press this button, and then use the Value Down/Up buttons to adjust the panning of a specific pad. See Operation > Kits > Editing to learn more. 21. Note: Press this button, and then use the Value Down/Up buttons to adjust the MIDI note of a specific pad. See Operation > Kits > Editing to learn more. 22. Indicators: Each of these lights illuminates when its corresponding pad is being played. Rear Panel 1. Power Input: Connect this input to a power outlet using the included power adapter. 2. Kick Input: Connect one of the included AUX IN footswitches to this input. When you press the footswitch, CompactKit 7 will receive the message in the same manner as it does when 5 you hit a pad. PHONES KICK HI-HAT 12V 42361 3. Hi-Hat Input: Connect one of the included footswitches to this input. If you hit the hi-hat pad while pressing the footswitch, it will produce a closed hi-hat sound. If you hit the hihat pad while the footswitch is up, it will produce an open hi-hat sound. If you press the footswitch without hitting a pad, it will produce a hi-hat pedal sound. 4. Headphone Output: Connect 1/4" (6.35 mm) stereo headphones (optional, sold separately) to this output. When headphones are connected, the speakers will be muted. 5. Aux In: Connect an optional audio source (e.g., smartphone, computer, etc.) to this input using a standard 1/8" (3.5 mm) stereo cable (not included). 6. USB Port: Connect this port to a USB port on your computer using a standard USB cable (not included). This will let you use CompactKit 7 as a USB MIDI controller. See the Operation > USB MIDI section to learn more about this. 5
-
 1
1 -
 2
2 -
 3
3 -
 4
4 -
 5
5 -
 6
6 -
 7
7 -
 8
8 -
 9
9 -
 10
10 -
 11
11 -
12
-
13
-
14
-
15
-
16
-
17
-
18
-
19
-
20
-
21
-
22
-
23
-
24
-
25
-
26
-
27
-
28
-
29
-
30
-
31
-
32
-
33
-
34
-
35
-
36
-
37
-
38
-
39
-
40
 |
 |
