Alesis Elevate 3 Quick Start Guide - Page 3
Quickstart Guide English, Connection Diagram, Rear Panel - speakers
 |
View all Alesis Elevate 3 manuals
Add to My Manuals
Save this manual to your list of manuals |
Page 3 highlights
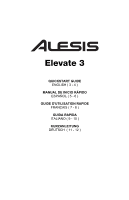
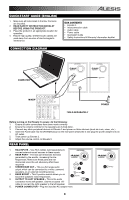
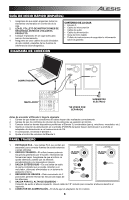
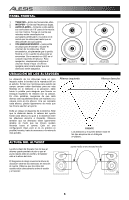
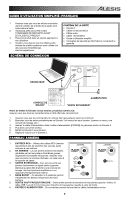
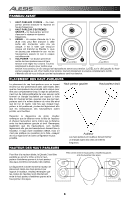
QUICKSTART GUIDE (ENGLISH) 1. Make sure all items listed in the Box Contents are included. 2. READ SAFETY INSTRUCTION BOOKLET BEFORE USING THE PRODUCT. 3. Place the product in an appropriate location for operation. 4. Ensure high quality, shielded audio cables are used away from sources of electromagnetic interference. CONNECTION DIAGRAM BOX CONTENTS y Elevate 3 y Interconnection cable y Audio cable y Power cable y Quickstart Guide y Safety Instructions & Warranty Information booklet COMPUTER* MIXER* *SOLD SEPARATELY POWER Before turning on the Elevate 3's power, do the following: 1. Ensure all cable connections have been made correctly. 2. Ensure the volume controls for the speakers are turned down. 3. Connect any other peripheral devices to Elevate 3 and power on those devices (such as a mic, mixer, etc.) 4. Insert the Power jack into the [POWER] input on the rear panel of Elevate 3 and plug the power adapter into an AC outlet. 5. Then power-up Elevate 3. 6. Adjust the volume control on Elevate 3. REAR PANEL 1. RCA INPUTS - Use RCA cables (sold separately) to connect external sound sources to these inputs. 2. REAR PORT - The rear port enhances the bass generated by the woofer, increasing the low frequencies. Make sure these ports are not obstructed since this will adversely affect bass response. 3. STEREO/SUB OUT - This is a full range audio output which can be connected to a mixer, powered speakers, or an external recording device. 4. BASS BOOST - This 2-position switch allows you to boost the speakers' bass frequencies. 5 5. OUTPUT TO LEFT SPEAKER - This is the audio connection to the left speaker. Use the included 1/8" cable to connect the right speaker to the left speaker. 6. POWER CONNECTOR - Plug the included AC adapter here. 2 1 3 4 6 2 5 3 1 1
-
 1
1 -
 2
2 -
 3
3 -
 4
4 -
 5
5 -
 6
6 -
 7
7 -
 8
8 -
 9
9 -
10
-
11
-
12
-
13
-
14
-
15
-
16
 |
 |