Alesis Elevate 5 MKII User Manual - Page 5
Features - frequency response
 |
View all Alesis Elevate 5 MKII manuals
Add to My Manuals
Save this manual to your list of manuals |
Page 5 highlights
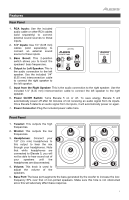
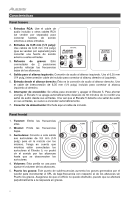
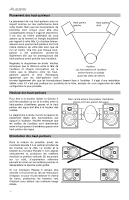
Features Rear Panel 1. RCA Inputs: Use the included audio cable or other RCA cables (sold separately) to connect external sound sources to these inputs. 2. 1/4" Inputs: Use 1/4" (6.35 mm) cables (sold separately) to connect an external sound source to these inputs. 3. Bass Boost: This 2-position switch allows you to boost the 6 31 5 speakers' bass frequencies. 7 2 4. Output to Left Speaker: This is 4 the audio connection to the left speaker. Use the included 1/4" (6.35 mm) interconnection cable to connect the right speaker to the left speaker. 5. Input from the Right Speaker: This is the audio connection to the right speaker. Use the included 1/4" (6.35 mm) interconnection cable to connect the left speaker to the right speaker. 6. Power On/Off Switch: Turns Elevate 5 on or off. To save energy, Elevate 5 will automatically power off after 30 minutes of not receiving an audio signal from its inputs. Once Elevate 5 detects an audio signal from its inputs, it will automatically power on again. 7. Power Connector: Plug the included power cable here. Front Panel 1. Tweeter: This outputs the high frequencies. 2. Woofer: This outputs the low 1 1 frequencies. 5 3. Headphones: Connect your 1/8" (3.5 mm) headphones to 55 5 this output to hear the mix through your headphones. Note that while headphones are 2 2 connected to Elevate 5, you will not be able to hear sound out of your speakers until the headphones are disconnected. 3 4 4. Volume: This knob is used to adjust the volume of the speakers. 5. Bass Port: The bass port augments the bass generated by the woofer to increase the lowfrequency SPL over that of non-ported speakers. Make sure this hole is not obstructed since this will adversely affect bass response. 5
-
 1
1 -
 2
2 -
 3
3 -
 4
4 -
 5
5 -
 6
6 -
 7
7 -
 8
8 -
 9
9 -
 10
10 -
 11
11 -
12
-
13
-
14
-
15
-
16
-
17
-
18
-
19
-
20
 |
 |
