Alesis Elevate 6 active User Manual - Page 6
Important, Volume, HF Trim, LF Trim, Tweeter, Woofer, Bass Reflex Port, Power Input, Power Switch, - monitors
 |
View all Alesis Elevate 6 active manuals
Add to My Manuals
Save this manual to your list of manuals |
Page 6 highlights
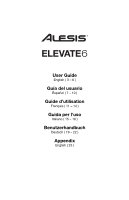
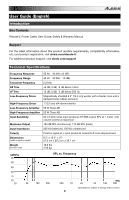
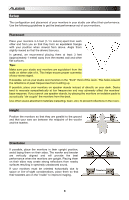
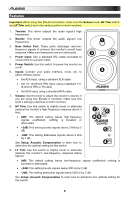
Features Important: When using two Elevate 6 monitors, make sure the Volume knob, HF Trim switch, and LF Trim switch are in the same position on both monitors. 1. Tweeter: This driver outputs the audio signal's high frequencies. 2. Woofer: This driver outputs the audio signal's low frequencies. 1 3. Bass Reflex Port: These ports discharge very-low- frequency signals to enhance the monitor's overall bass response. Make sure these ports are not obstructed. 3 3 4. Power Input: Use a standard IEC cable (included) to connect this to a power outlet. 5. Power Switch: Use this switch to power the monitor on or off. 2 6. Inputs: Connect your audio interface, mixer, etc. to either of these inputs: • the XLR input, using a standard XLR cable • the 1/4" (6.35mm) TRS input, using a standard 1/4" (6.35mm) TRS or TS cable • the RCA input, using a standard RCA cable 7. Volume: Use this knob to adjust the monitor's volume. If you are using two Elevate 6 monitors, make sure this knob's setting is identical on both monitors. 8. HF Trim: Use this switch to slightly boost or attenuate (reduce) the monitor's high-frequency response above 3 kHz: • 0dB: This default setting leaves high-frequency signals unaffected; nothing is boosted or attenuated. 7 6 89 • +2dB: This setting boosts signals above 3 kHz by 2 dB. 5 • -2dB: This setting attenuates signals above 3 kHz by 2 dB. See Setup: Acoustic Compensation to learn how to 4 determine the optimal setting for this switch. 9. LF Trim: Use this switch to slightly boost or attenuate (reduce) the monitor's low-frequency response below 500 Hz: • 0dB: This default setting leaves low-frequency signals unaffected; nothing is boosted or attenuated. • +2dB: This setting boosts signals below 500 Hz by 2 dB. • -2dB: This setting attenuates signals below 500 Hz by 2 dB. See Setup: Acoustic Compensation to learn how to determine the optimal setting for this switch. 6
-
 1
1 -
 2
2 -
 3
3 -
 4
4 -
 5
5 -
 6
6 -
 7
7 -
 8
8 -
 9
9 -
 10
10 -
 11
11 -
 12
12 -
13
-
14
-
15
-
16
-
17
-
18
-
19
-
20
-
21
-
22
-
23
-
24
 |
 |