Alesis Harmony 54 User Guide - Page 5
Rear Panel, Bottom Panel
 |
View all Alesis Harmony 54 manuals
Add to My Manuals
Save this manual to your list of manuals |
Page 5 highlights
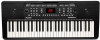
17. Fill In: While an accompaniment rhythm is playing, press this button to make the keyboard temporarily play a new rhythm or "drum fill." See Operation > Adding Background Music > Accompaniment Rhythms for more information. 18. Intro/Ending: Press this button to make the keyboard play either an introductory or ending drumbeat, depending on whether an accompaniment rhythm is already playing. See Operation > Adding Background Music > Accompaniment Rhythms for more information. 19. One-Key: Press this button to activate the one-key feature. When this feature is activated, you can play one key at a time to perform a demo song. See Operation > Demo Songs for more information. 20. Tempo: Press the Tempo + or Tempo - button to change the keyboard's BPM setting. This will affect playback of the rhythm and chord accompaniments, demo songs, and metronome. Press the Tempo + and Tempo - buttons simultaneously to reset to the default tempo (120 BPM). 21. Rhythm Volume: Press the Rhythm Vol + or Rhythm Vol - button to increase or decrease the accompaniment rhythm volume. Press the Rhythm Vol + and Rhythm Vol - simultaneously to reset to the default volume level (A07). 22. Single Chord: Press this button to enable the accompaniment chord feature. When this feature is enabled, you can use the keys below G2 to produce chords that automatically play along with the selected accompaniment rhythm. Pressing the Single Chord button (as opposed to Fingered Chord) allows you to use condensed chord shapes instead of using all the keys normally required for a full chord. See Operation > Adding Background Music > Accompaniment Chords for more information. 23. Fingered Chord: Press this button to enable the accompaniment chord feature. When this feature is enabled, you can use the keys below G2 to produce chords that automatically play along with the selected accompaniment rhythm. Pressing the Fingered Chord button (as opposed to Single Chord) requires that you play full chord shapes instead of a condensed set of keys for each chord. See Operation > Adding Background Music > Accompaniment Chords for more information. 24. Chord Clear: Press this button to turn the accompaniment chord feature off. 25. Chord Volume: Press the Chord Vol + or Chord Vol - button to increase or decrease the accompaniment chord volume. Press the Chord Vol + and Chord Vol - buttons simultaneously to reset the accompaniment chords to their default volume level (u07). 26. Program: Press this button to program a custom accompaniment rhythm. See Operation > Adding Background Music > Rhythm Programming for more information. 27. Record: Press this button to record a song. See Operation > Recording for more information. 28. Play: Press this button to play a custom accompaniment rhythm or recorded song. 29. Drum Kit Buttons: Press these buttons to play percussion sounds. See the images on the buttons to note which button plays which type of sound. The Drum Kit Buttons are particularly useful for the Rhythm Programming feature. See Operation > Adding Background Music > Rhythm Programming for more information. Rear Panel 1. Mic: Connect the included microphone here to sing while playing the keyboard. 2. Phones (1/8" / 3.5 mm TRS): Connect headphones (not included) to this output to hear the keyboard. Note: Plugging into the Phones output will mute the MIC PHONES DDCC192VV keyboard's internal speakers. 3. Power Input: Connect the included power adapter here. 12 3 Bottom Panel 1. Battery Compartment: Install 6 AA batteries here to power the keyboard when you are not using the power adapter. 1 5
-
 1
1 -
 2
2 -
 3
3 -
 4
4 -
 5
5 -
 6
6 -
 7
7 -
 8
8 -
 9
9 -
 10
10 -
 11
11 -
12
-
13
-
14
-
15
-
16
-
17
-
18
-
19
-
20
-
21
-
22
-
23
-
24
-
25
-
26
-
27
-
28
-
29
-
30
-
31
-
32
-
33
-
34
-
35
-
36
-
37
-
38
-
39
-
40
-
41
-
42
-
43
-
44
-
45
-
46
-
47
-
48
-
49
-
50
-
51
-
52
-
53
-
54
-
55
-
56
 |
 |
