Alesis Melody 61 User Guide - Page 7
Rear Panel, Bottom Panel - power adapter
 |
View all Alesis Melody 61 manuals
Add to My Manuals
Save this manual to your list of manuals |
Page 7 highlights
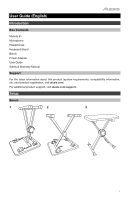
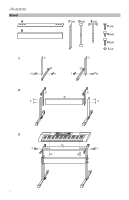
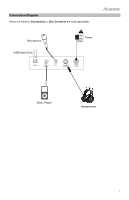
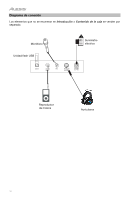
22. Fingered: Press this button after starting a rhythm to use the automatic chord accompaniment and play a fingered chord on the keys in the AUTO BASS CHORD area of the keyboard, which is F# and below. You can play all the keys of a chord, including inverted chords. Press this button again to disable the chord function. 23. Chord Timbre: Press this button to change the musical tone of the notes in the accompanying chord. 24. Metronome: The metronome contains four tempos: 1/4, 2/4, 3/4 and 4/4, respectively. Press this button continuously to cycle through and select one of the four tempos. To disable the metronome, wait 4 seconds and then press the button again. 25. Sustain: Press this button to activate a sustain effect which simulates a sustain pedal when playing the keyboard. Press this button again to disable the sustain effect. 26. Vibrato: Press this button to activate a pulsating change to the pitch when playing the keyboard. Press this button again to disable to vibrato effect. 27. Dual: Press this button to layer two sounds together. The sound that you were using before pressing the Dual button will be used for one part of the layer. To select the other sound for the layer, press the Chord Timbre button and enter a number for the sound or use the + and - buttons. Press the Dual button again to disable the dual-tone function. 28. Split: Press this button to split the keyboard into two zones. The sound that you were using before pressing the Split button will be applied to the left-hand side of the keyboard. To select a sound for the right-hand side, press the Chord Timbre button and enter a number for the sound or use the + and - buttons. Press the Split button again to disable the keyboard split. 29. Keyboard Percussion: Press this button to play the built-in drumkit and percussion sounds. Press this button again to disable the keyboard percussion function. 30. Effect: Press this button to select between one of five EQ settings for MP3 music playback. 31. MP3 Volume Control: Adjusts the volume for the MP3 file playback. 32. Previous: Selects the previous MP3 track on the USB flash drive. 33. Next: Selects the next MP3 track on the USB flash drive. 34. Play/Pause: Playback or pause a MP3 file on the USB flash drive. 35. Stop: Stop the playback of a MP3 file on the USB flash drive. 36. Playback Mode: Select to playback order of continuous, random, and single. Rear Panel 1. USB Port: Connect a USB flash drive here to playback MP3 files. 2. Audio Input: Connect a smartphone, MP3 player, or UDISK AUDIO MIC PHONES/ INPUT OUTPUT 9V similar audio device here to play the audio signal through 1 234 5 the keyboard speakers or headphone output. 3. Mic Input: Connect a microphone here to sing while playing the keyboard. 4. Phones/Output: Connect headphones here to hear the keyboard sounds, rhythms, songs, audio input source, or microphone source. 5. Power Input: Connect the included power adapter here. Bottom Panel 1. Battery Compartment: Install 6 "AA" batteries here to power the keyboard if you are not using the power adapter. 1 7
-
 1
1 -
 2
2 -
 3
3 -
 4
4 -
 5
5 -
 6
6 -
 7
7 -
 8
8 -
 9
9 -
 10
10 -
 11
11 -
 12
12 -
13
-
14
-
15
-
16
-
17
-
18
-
19
-
20
-
21
-
22
-
23
-
24
-
25
-
26
-
27
-
28
-
29
-
30
-
31
-
32
-
33
-
34
-
35
-
36
-
37
-
38
-
39
-
40
 |
 |