Alesis MultiMix 6 Cue Quick Start Guide - Page 4
Applications - headphone amplifier
 |
View all Alesis MultiMix 6 Cue manuals
Add to My Manuals
Save this manual to your list of manuals |
Page 4 highlights
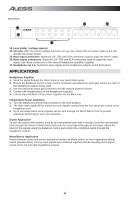
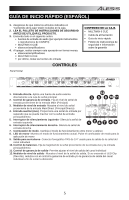
Rear Panel 13 14 16 15 17 13. Fuse holder / voltage selector 14. AC inlet- After the correct voltage has been set you can connect the AC power cable to the unit and the AC power socket 15. Main input connectors- Balanced 1/4" TRS and XLR connectors used to input the stereo signal 16. Main output connectors- Balanced 1/4" TRS and XLR connectors used to output the main signal. Use these connectors to link several headphone amplifiers together 17. Headphone out 1-6- Sends the same signal as the headphone outputs on the front panel APPLICATIONS Headphone Amplifier 1. Send the signal through the Direct input or rear panel Main inputs 2. Ensure the Balanced control is fully counter-clockwise and adjust the input gain control for each of the headphone outputs being used 3. Use the individual output gain controls to set the desired channel volume 4. Connect the headphone(s) to the headphone output(s) 5. Link as many Multimix 6 Cue mixers together via the Main outs Independent Power Amplifiers 1. Turn the Balanced controls fully clockwise to the AUX position. 2. The Main input signal will be muted and only signals coming from the Aux inputs are routed to the headphone outs 3. Up to six independent stereo signals can be sent through the MULTIMIX 6 CUE to provide individual monitoring for up to six musicians Studio Application To mix one source with another, such as an instrumental track with a vocalist, route the instrumental track through the Direct or Main inputs and route the vocal signal through an Aux input. Adjust the blend of the signals using the Balanced control and monitor the combined signal through the headphone outputs. Mono/Stereo Application Switch between mono and stereo operational modes via Mode switch. In mono application (Mode switch pressed down), the two input signals are combined together and the resulting mono signal routes to the left and right headphone outputs. 4
-
 1
1 -
 2
2 -
 3
3 -
 4
4 -
 5
5 -
 6
6 -
 7
7 -
 8
8 -
 9
9 -
 10
10 -
11
-
12
-
13
-
14
-
15
-
16
 |
 |
