Alesis MultiMix 8 USB FX Quick Start Guide - Page 3
Audio Setup - driver windows 7
 |
View all Alesis MultiMix 8 USB FX manuals
Add to My Manuals
Save this manual to your list of manuals |
Page 3 highlights
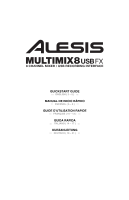
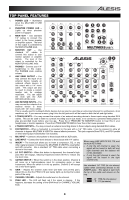
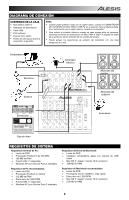
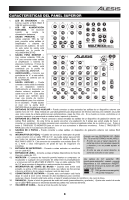
AUDIO SETUP The MULTIMIX 8 USB FX is a class-compliant device that can be used with virtually any digital audio workstation or recording software that supports USB audio. If you want to use the included software, insert the CD into your computer and follow the on-screen instructions. To enable your MULTIMIX 8 USB FX to send and receive audio to and from your computer, follow the instructions below for your computer's operating system: Be sure your audio software program is set up to receive audio via the MULTIMIX 8 USB FX. This can usually be done in your software's "Preferences" or "Device Setup." Please consult your software manual for more information. WINDOWS 7: 1. Use the included cable to connect the MULTIMIX 8 USB FX to your computer. 2. Go to Start Menu Control Panel Hardware and Sound Sound. 3. Click the Playback tab and select USB Audio Codec* as the default device. * If you have other USB audio devices connected to your computer, which may have identical names, you may need to try selecting each one until the MULTIMIX 8 USB FX is recognized. 4. Click the Recording tab and select USB Audio Codec* as the default device. 5. Click Properties in the lower right-hand corner. If you experience too much latency 6. In the new window, click the Advanced tab and select 2-channel, 16-bit, after adjusting your software latency 44100 Hz (CD Quality) as the default format. settings, we recommend the free 7. Uncheck both boxes under Exclusive Mode. ASIO4ALL (Audio Stream Input/Output) 8. Click the Levels tab and set the slider to "4." driver for PC at www.asio4all.com. 9. Click OK to close the Properties window. ASIO drivers generally perform better 10. Click OK to close the Sound control panel. and with lower latency since they create a more efficient communication WINDOWS VISTA: between audio devices and software. 1. Use the included cable to connect the MULTIMIX 8 USB FX to your computer. 2. Go to Start Menu Control Panel Sound. (If you don't see Sound, select Switch to Classic View, and the Sound Control Panel should become available.) 3. Click the Playback tab and select USB Audio Codec* as the default device. 4. Click the Recording tab and select USB Audio Codec* as the default device. 5. Click Properties in the lower right-hand corner. 6. In the new window, click the Advanced tab and select 2-channel, 16-bit, 44100 Hz (CD Quality) as the default format. 7. Uncheck both boxes under Exclusive Mode. 8. Click OK to close the Properties window. 9. Click OK to close the Sound control panel. WINDOWS XP: 1. Use the included cable to connect the MULTIMIX 8 USB FX to your computer. 2. Go to Start Menu Control Panel Sounds and Audio Devices. 3. Click the Audio tab. 4. Under Sound Playback and Sound Recording, select USB Audio Codec* as the default device. 5. Click OK. MAC: 1. Use the included cable to connect the MULTIMIX 8 USB FX to your computer. 2. Go to Applications Utilities Audio MIDI Setup. 3. In the Audio Devices tab under System Settings, select USB Audio Codec* as your Default Input and Default Output. 4. Close the window. REAR PANEL FEATURES 1. POWER IN - Use the included power adapter to connect the MULTIMIX 8 USB FX to a power outlet. While 2 3 1 4 the power is switched off, plug the power supply into the MULTIMIX 8 USB FX first, then plug the power supply into a power outlet. 2. POWER SWITCH - Turns the MULTIMIX 8 USB FX on and off. Turn on the MULTIMIX 8 USB FX after all input devices have been connected and before you turn on amplifiers. Turn off amplifiers before you turn off the MULTIMIX 8 USB FX. 3. PHANTOM POWER - This switch activates and deactivates phantom power. When activated, phantom power supplies +48V to the XLR mic inputs. Please note that most dynamic microphones do not require phantom power, while most condenser microphones do. Consult your microphone's documentation to find out whether it needs phantom power. 4. USB PORT - Use the included cable to connect the MULTIMIX 8 USB FX to a computer. MULTIMIX 8 USB FX requires a USB 1.1 or higher (e.g. USB 2.0) connection. 3
-
 1
1 -
 2
2 -
 3
3 -
 4
4 -
 5
5 -
 6
6 -
 7
7 -
 8
8 -
 9
9 -
10
-
11
-
12
-
13
-
14
-
15
-
16
-
17
-
18
-
19
-
20
-
21
-
22
-
23
-
24
 |
 |