Alesis QX25 Quick Start Guide
Alesis QX25 Manual
 |
View all Alesis QX25 manuals
Add to My Manuals
Save this manual to your list of manuals |
Alesis QX25 manual content summary:
- Alesis QX25 | Quick Start Guide - Page 1
QX25 QUICKSTART GUIDE ENGLISH ( 3 - 8 ) QGUUEIÍECASNKPDGSAELÑTISINAOHIRLC( T2(IO9-GR-6U1Á) I4PD)IEDO GGUUIDÍAE DD'EUTINILIICSIAOTIROÁNPRIDAPOIDE FERSAPNAÑÇOALIS( 7( 1-511- 2) 0 ) GUIDE D'UGTUIILDIASARTAIPOIDNARAPIDE FIRTAANLÇIAANISO( (1221- -1626) ) GIKTAUULIRIDAZNAAONR(LA1E7PIT-IDU21AN)G DEUTSCH ( - Alesis QX25 | Quick Start Guide - Page 2
- Alesis QX25 | Quick Start Guide - Page 3
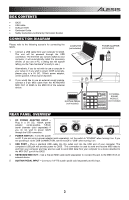
• USB cable • Software DVD • Quickstart Guide • Safety Instructions & Warranty Information Booklet CONNECTION DIAGRAM Please refer to the following scenario for connecting the QX25. 1. Connect a USB cable from your computer to QX25. The unit will be powered through the USB connection. The first time - Alesis QX25 | Quick Start Guide - Page 4
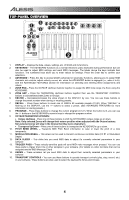
key to confirm your selections. 3. ADVANCED - Press this key to access QX25's advanced or secondary functions, allowing you to assign MIDI channels, set controls, adjust velocity curves, etc. when the ADVANCED to transpose the KEYBOARD's up or down. 10. PITCH BEND WHEEL - Transmits MIDI Pitch Bend - Alesis QX25 | Quick Start Guide - Page 5
and their numbers. ZONE CHANNEL: Assigns the MIDI channel over which QX25's Zone controllers will send MIDI messages. 1. Press the Advanced Key. 2. Press the KEYBOARD's ZONE CHAN key. 3. Press the Transport control that corresponds to the Zone whose MIDI channel you would like to edit. The - Alesis QX25 | Quick Start Guide - Page 6
MIDI OUT ports are disabled. 2. Press ADVANCED when finished. STORE: Stores QX25's controls in a preset: 1. Press the KEYBOARD's STORE key. 2. Use the KEYBOARD's numeric keys to enter a preset (01-20). 3. Press the KEYBOARD's ENTER key to confirm your choice. CURVE: Allows you to adjust the velocity - Alesis QX25 | Quick Start Guide - Page 7
Zone (or Zones) you will be defining. The transport controls used for the selected zones buttons will flash. 3. Press the KEYBOARD key corresponding to the lowest MIDI note that will be in that Zone. 4. Press the KEYBOARD key corresponding to the highest MIDI note that will be in that Zone. 5. Wait - Alesis QX25 | Quick Start Guide - Page 8
TROUBLESHOOTING PROBLEM CAUSE SOLUTION The display does not light up. No sound from target device. Notes sustain continuously. No power. QX25 not properly connected. QX25 connected after software application has started. Problem is caused by use of a USB hub. Software application not set to - Alesis QX25 | Quick Start Guide - Page 9
conexión USB. La primera vez que conecte el QX25 a la computadora, instala automáticamente los drivers necesarios. (Si usa una PC, aparece un de sonido externo, conecte un cable MIDI de 5 pines desde la SALIDA MIDI DE TECLADO del QX25 a la ENTRADA MIDI del dispositivo externo. PEDAL DE SOSTENIDO - Alesis QX25 | Quick Start Guide - Page 10
ENTER para confirmar su selección. 3. AVANZADAS - Pulse esta tecla para acceder a las funciones avanzadas o secundarias del QX25 que le permiten asignar canales MIDI, configurar controles, ajustar curvas de velocidad, etc. cuando el botón AVANZADAS está aplicado (es decir, está encendido). Para - Alesis QX25 | Quick Start Guide - Page 11
por el cual los controladores de zona del QX25 envían los mensajes MIDI. 1. Pulse la tecla Advanced. 2. Pulse la tecla ZONE CHAN del teclado. 3. Pulse el control de transporte que corresponde a la zona cuyo canal MIDI desea editar. Los controles de transporte usados para los botones de las zonas - Alesis QX25 | Quick Start Guide - Page 12
(01-20)... 3. Presione la tecla ENTER del TECLADO para confirmar su selección. SELECCIÓN DE CONTROLES: le permite cambiar lo que se selecciona el control 1. Pulse la QX25's CTRL SELECT key. El número del control utilizado por última vez aparecerá en la pantalla DISPLAY. 2. Usted puede seleccionar el - Alesis QX25 | Quick Start Guide - Page 13
tocar simultáneamente partes diferentes o solapadas del TECLADO por canales MIDI diferentes. Por ejemplo, podría enviar el registro inferior del TECLADO almacena presets en el QX25, puede guardar los valores de las distintas combinaciones de controles. Los controles del QX25 se dividen en los - Alesis QX25 | Quick Start Guide - Page 14
) de la aplicación. Asegúrese de que el QX25 esté enviando datos MIDI en el canal esperado por el dispositivo destinatario. Pulse los botones de transporte > simultáneamente para enviar un mensaje de pánico MIDI, que reinicia todos los controles y envía un mensaje All Notes Off (Todas las - Alesis QX25 | Quick Start Guide - Page 15
peut être utilisée pour envoyer des données MIDI de votre ordinateur à un appareil externe branché à la sortie (MIDI OUT) du QX25. 4. KEYBOARD MIDI OUT - Vous pouvez brancher un câble MIDI à cinq broches (non inclus) à cette sortie et à l'entrée MIDI IN d'un appareil externe. 5. ENTRÉE DE PÉDALE - Alesis QX25 | Quick Start Guide - Page 16
la valeur des paramètres. Appuyez sur le bouton Enter pour confirmer vos sélections. 3. ADVANCED - Cette touche permet d'accéder aux fonctions évoluées et secondaires du QX25, vous permettant d'assigner les canaux MIDI, de régler les commandes, les courbes de vitesses, etc. lorsque la touche est - Alesis QX25 | Quick Start Guide - Page 17
QX25 sous tension. GLOBAL MIDI CHANNEL : Pour assigner le canal MIDI principal du QX25 : 1. Appuyez le ADVANCED bouton. 2. Appuyez sur la touche « GLOBAL MIDI sauvegarder les modifications, appuyez seulement sur ADVANCED. CONTROL ASSIGN: Pour assigner le MIDI message transmis des potentiomètres, - Alesis QX25 | Quick Start Guide - Page 18
é par l'ordinateur au QX25 (ordinateur branché au port USB du QX25), et le QX25 envoie les messages 5-pin MIDI par la sortie KEYBOARD MIDI OUT. • Lorsque « 4 » s'affiche, cela signifie que les deux sorties MIDI (USB MIDI OUT ET MIDI OUT) sont désactivées. 2. Appuyez sur ADVANCED lorsque vous avez - Alesis QX25 | Quick Start Guide - Page 19
ées sur le clavier simultanément en les envoyant sur des canaux MIDI différents. Par exemple, vous pourriez envoyer le registre grave du clavier éréglages sur le QX25, il est possible de sauvegarder les paramètres de différentes combinaisons de commandes. Les commandes du QX25 sont divisées par - Alesis QX25 | Quick Start Guide - Page 20
Si vous commandez un module externe matériel, assurez-vous que le câble MIDI est branché du QX25 à l'entrée MIDI de l'appareil. Relancez le logiciel seulement après avoir branché le QX25. Essayez de débrancher le QX25 du répéteur USB et de le brancher directement à l'ordinateur. Assurez-vous que le - Alesis QX25 | Quick Start Guide - Page 21
USB. La prima volta che si collega il QX25 al computer verranno installati automaticamente tutti i driver necessari. (Se si utilizza un PC, audio esterno, collegare un cavo MIDI a 5 poli dall'USCITA MIDI TASTIERA (KEYBOARD MIDI OUT) del QX25 all'INGRESSO MIDI (MIDI IN) del dispositivo esterno. - Alesis QX25 | Quick Start Guide - Page 22
). 3. ADVANCED (avanzate) - Premere questo tasto per accedere alle funzioni avanzate o secondarie del QX25, che consentono di assegnare canali MIDI, impostare dati continui del controller (CC #1 o Modulation Depth). 12. DATA SLIDER - il cursor consentono di inviare dati MIDI per regolare i relativi - Alesis QX25 | Quick Start Guide - Page 23
sinistra e destra TRANSPORT CONTROL ("loop" e "record") mentre si accende il QX25. GLOBAL MIDI CHANNEL (canale MIDI globale): per assegnare il canale MIDI globale del QX25 procedere come segue: 1. Premere il ADVANCED pulsanti. 2. Premere 'GLOBAL MIDI CHANNEL' (canale MIDI globale) sulla tastiera - Alesis QX25 | Quick Start Guide - Page 24
): assegna il canale MIDI sul quale i controller di zona del QX25 invieranno messaggi MIDI. 1. Premere il tasto Advanced. 2. Premere il MIDI OUT (uscita MIDI): il QX25 è dotato di due porte MIDI OUT - USB MIDI OUT e KEYBOARD MIDI OUT. È possibile impostare il QX25 in modo tale che invii dati MIDI - Alesis QX25 | Quick Start Guide - Page 25
ZONE La gamma delle note MIDI del QX25 può essere suddivisa in tre Zone, assegnabili. lampeggia la scritta "ZR" (ZONE RANGE). 2. Servirsi dei tre tasti TRANSPORT CONTROL (indicati con ZONE 1-3) per selezionare la Zona (o le Zone) da definire. sono stati selezionati non verranno coinvolti. 25 - Alesis QX25 | Quick Start Guide - Page 26
il computer. Se si controlla un modulo hardware esterno, assicurarsi che il cavo MIDI sia collegato dal QX25 alla porta MIDI IN del dispositivo. Riavviare l'applicazione software con il controller inserito. Scollegare il QX25 dall'hub USB e collegarlo direttamente al computer. Assicurarsi che il - Alesis QX25 | Quick Start Guide - Page 27
nun einsatzbereit ist.) Wenn Sie keinen Computer in Ihrem Setup verwenden oder wenn Sie den QX25 extern mit Strom versorgen möchten, verwenden Sie ein 100mA möchten, verbinden Sie den Anschluss KEYBOARD MIDI OUT des QX25 mit einem 5-poligen MIDI-Kabel mit dem Anschluss MIDI IN des externen Gerätes. - Alesis QX25 | Quick Start Guide - Page 28
ADVANCED - Mit dieser Taste können Sie auf die erweiterten und sekundären Funktionen des QX25 zugreifen und MIDI- MIDI-Notenbereich einer Zone mithilfe des KEYBOARDS zuzuweisen. 5. ZONE GRP - Drücken Sie gleichzeitig die Tasten TRANSPOSE Up/Down und verwenden Sie anschließend die TRANSPORT CONTROL - Alesis QX25 | Quick Start Guide - Page 29
äts die linken und rechten TRANSPORT CONTROL-Tasten gedrückt ("Loop" und "Record"). GLOBAL MIDI CHANNEL: Weist dem QX25 seinen globalen MIDI-Kanal durch folgende Schritte zu: 1. Drücken Sie die ADVANCED taste. 2. Drücken Sie am Keyboard 'GLOBAL MIDI CHANNEL'. 3. Benutzen Sie die numerischen Tasten - Alesis QX25 | Quick Start Guide - Page 30
(via USB-Port des QX25 verbunden) an den QX25 gesendet werden, während alle Performances am QX25 ihre eigenen MIDIBefehle über KEYBOARD MIDI OUT senden. • Wenn "4" auf der DISPLAY-Anzeige aufscheint, sind die Ausgangsports von USB MIDI und KEYBOARD MIDI deaktiviert. 2. Drücken Sie ADVANCED, wenn Sie - Alesis QX25 | Quick Start Guide - Page 31
MIDI-Notenbereich des QX25 kann in drei zuweisbare Zonen eingeteilt werden. Diese Zonen können sich überlappen, sich gegenseitig ausschließen oder sogar identisch sein. Neben dem Keyboard können auch das PitchRad und das Modulationsrad pro Verwenden Sie die TRANSPORT CONTROL-Tasten (beschriftet als - Alesis QX25 | Quick Start Guide - Page 32
LÖSUNG Kein Strom. QX25 ist nicht vorschriftsmäßig angeschlossen. QX25 wurde angeschlossen, nachdem das Programm gestartet wurde. Problem wird von einem USBHub verursacht. Programmeinstellungen gestatten keinen Empfang von MIDI-Daten vom QX25. MIDI-Kanal am QX25 und MIDI-Eingangskanal des Programms - Alesis QX25 | Quick Start Guide - Page 33
VELOCITY CURVES 33 - Alesis QX25 | Quick Start Guide - Page 34
138 139 140 141 142 143 144 145 146 147 148 149 150 151 152 153 154 155 156 157 158 DESCRIPTION Standard MIDI CCs Channel Mode Messages Controller Off Pitch Bend Range Channel Fine Tune Channel Coarse Tune Channel Pressure RPN Coarse RPN Fine NRPN Coarse NPRN Fine Master Volume GM - Alesis QX25 | Quick Start Guide - Page 35
158 DESCRIPTION Standard MIDI CCs Channel Mode Messages Controller Off Pitch MIDI CC Start value End value MIDI CC Start value End value - Start value End value - Start value End value MIDI CC Toggle value 2 Toggle value 1 Note Velocity off Velocity on Note Velocity off Velocity - Alesis QX25 | Quick Start Guide - Page 36
138 139 140 141 142 143 144 145 146 147 148 149 150 151 152 153 154 155 156 157 158 DESCRIPTION Standard MIDI CCs Channel Mode Messages Controller Off Pitch Bend Range Channel Fine Tune Channel Coarse Tune Channel Pressure RPN Coarse RPN Fine NRPN Coarse NPRN Fine Master Volume GM - Alesis QX25 | Quick Start Guide - Page 37
CHART 1. Basic Information MIDI channels Note numbers Program change Bank Select response Modes supported: Mode 1: Omni-On, Poly Mode 2: Omni-On, Mono Mode 3: Omni-Off, Poly Mode 4: Omni-Off, Mono Multi Mode Note-On Velocity Note-Off Velocity Channel Aftertouch Poly (Key) Aftertouch Pitch Bend - Alesis QX25 | Quick Start Guide - Page 38
POWER: KEYBOARD: PADS, KNOBS: ACCESSORIES: MIDI OUTPUTS: USB: USB, 5V DC, 100mA, center-positive, 5.5mm barrel diameter (sold separately) 25 keys 4 velocity-sensitive pads, 8 knobs Quickstart Guide, USB cable 1 5-pin jack 1 slave connector (MIDI over USB) http://www.alesis.com/QX25 THIS DEVICE - Alesis QX25 | Quick Start Guide - Page 39
- Alesis QX25 | Quick Start Guide - Page 40
www.alesis.com 7-51-0379-B
-
 1
1 -
 2
2 -
 3
3 -
 4
4 -
 5
5 -
 6
6 -
 7
7 -
8
-
9
-
10
-
11
-
12
-
13
-
14
-
15
-
16
-
17
-
18
-
19
-
20
-
21
-
22
-
23
-
24
-
25
-
26
-
27
-
28
-
29
-
30
-
31
-
32
-
33
-
34
-
35
-
36
-
37
-
38
-
39
-
40
 |
 |

QX25
QUICKSTART GUIDE
ENGLISH ( 3 - 8 )
GUÍA DE INICIO RÁPIDO
ESPAÑOL ( 9 - 14 )
GUIDE D'UTILISATION RAPIDE
FRANÇAIS ( 15 - 20 )
GUIDA RAPIDA
ITALIANO ( 21 - 26 )
KURZANLEITUNG
DEUTSCH ( 27 - 32 )