Alesis SamplePad Pro User Guide
Alesis SamplePad Pro Manual
 |
View all Alesis SamplePad Pro manuals
Add to My Manuals
Save this manual to your list of manuals |
Alesis SamplePad Pro manual content summary:
- Alesis SamplePad Pro | User Guide - Page 1
SAMPLEPAD PRO User Guide English ( 2 - 9 ) Guía del usuario Español ( 10 - 17 ) Guide d'utilisation Français ( 18 - 25 ) Guida per l'uso Italiano ( 26 - 33 ) Benutzerhandbuch Deutsch ( 34 - 42 ) Appendix English ( 43 ) - Alesis SamplePad Pro | User Guide - Page 2
- Alesis SamplePad Pro | User Guide - Page 3
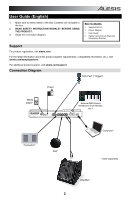
in the box. 2. READ SAFETY INSTRUCTION BOOKLET BEFORE USING THE PRODUCT. 3. Study the connection diagram. Box Contents SamplePad Pro Power Adapter User Guide Safety Instructions & Warranty Information Booklet Support For product registration, visit alesis.com. For the latest information - Alesis SamplePad Pro | User Guide - Page 4
You can use this input to trigger samples assigned to the EXT 2 trigger location of each kit on SamplePad Pro. 10. Main Out - Use standard 1/4" cables to connect this output to a speaker or amplifier system. (For mono sound, connect a cable only to the Left output.) 11. MIDI In - Use a standard five - Alesis SamplePad Pro | User Guide - Page 5
, 6 sensitivity, panning, reverb, level, MIDI Note, mode, and mute group parameters of pad or external trigger is struck. To assign a sound to one of the layers of a pad or ext. trigger: 1. Move the cursor to the Sample Location parameter by pressing the Cursor Up and Cursor Down buttons. 2. Use - Alesis SamplePad Pro | User Guide - Page 6
be treated as a 3 MB sample when it is assigned to a pad). • The max number of files that can be located in the root directory is 512. • When a .WAV file is selected, it will take a few seconds to load into the memory. • SamplePad Pro supports mono or stereo .WAV files, with a sample rate of 48K, 44 - Alesis SamplePad Pro | User Guide - Page 7
from the beginning after it reaches the end of the sample. To stop the loop, strike the pad or ext. trigger again. • STOP After the pad or ext. trigger is struck, all samples currently being played by SamplePad Pro will be muted. • TMP Strike the pad or ext. trigger several times in the TMP mode to - Alesis SamplePad Pro | User Guide - Page 8
Turns the metronome on or off. • Sound: Selects the sound of the metronome from Voice, Metronome, 9/8, and 9/16. Footswitch The footswitch input of SamplePad Pro supports both standard 1/4" TS single-button and 1/4" TRS Stop All: Mutes all currently playing samples • Next Kit: Selects the next kit - Alesis SamplePad Pro | User Guide - Page 9
Changes: Sets whether SamplePad Pro will send program changes over the MIDI Send Channel when a kit is changed. The available parameters are Yes and No. • Ext. Clock: Sets whether the SamplePad Pro will send or receive MIDI Clock. This feature can also be set to OFF. Load Samples/Kits Via USB - Alesis SamplePad Pro | User Guide - Page 10
sistema, información de compatibilidad, etc.), visite alesis.com/samplepad-pro. Para soporte adicional del producto, visite alesis.com/support. Diagrama de conexión Suministro eléctrico Pad de bombo* ("Disparador") Reproductor multimedia* Dispositivo MIDI externo (teclado, módulo de batería, etc - Alesis SamplePad Pro | User Guide - Page 11
usando un pedal de hi-hat variable. Recomendamos usar el pedal Alesis DMHat Pedal con el SamplePad Pro. 7. Entrada del interruptor de pedal - Conecte aquí un interruptor EXT 1B en cada kit del SamplePad Pro. 9. Pad 2 - Conecte a esta entrada un pad de batería, pad de platillo, o disparador mediante - Alesis SamplePad Pro | User Guide - Page 12
a la ENTRADA MIDI de un dispositivo MIDI externo. 13. Puerto USB/MIDI- Conecte el SamplePad Pro a un ordenador para enviar y recibir datos MIDI o para cargar Utilice los botones cursor izquierdo o cursor derecho para seleccionar el pad o disparador externo al que desea asignarle la muestra. 3. Mueva - Alesis SamplePad Pro | User Guide - Page 13
, esto significa lo siguiente: • No use estos caracteres No use espacios. • Limite el nombre del archivo pad). • El número máximo de archivos que se pueden ubicar en el directorio raíz es 512. • Cuando se selecciona un archivo .WAV, demora algunos segundos en cargarse en la memoria. • SamplePad Pro - Alesis SamplePad Pro | User Guide - Page 14
al final de la muestra. Para comenzar el loop, golpee el pad o disparador externo nuevamente. • PARAR Tras golpear un pad o disparador externo, todas las muestras actualmente en reproducción en el SamplePad Pro se silenciarán. • TMP Golpee el pad o disparador externo varias veces en modo TMP para - Alesis SamplePad Pro | User Guide - Page 15
este pad al mismo número que estableció para el primer pad. Menú de opciones El menú de opciones del SamplePad Pro contiene ajustes nomo • Switch (Activación): Activa (ON) y desactiva (OFF) el metrónomo. • Sound (Sonido): Selecciona el sonido del metrónomo entre voz, metrónomo, claves, baquetas, - Alesis SamplePad Pro | User Guide - Page 16
MIDI por el que el SamplePad Pro enviará datos MIDI. Los parámetros disponibles son los canales individuales entre 1-16. • Receive Program Changes (Recibir cambios de programa): Determina si el SamplePad Pro en el SamplePad Pro durante dos segundos Otros • Pad Curve (Curva del pad): Selecciona el - Alesis SamplePad Pro | User Guide - Page 17
valores de fábrica Para restablecer los kits internos y ajustes globales a los valores de fábrica, mantenga pulsados los botones cursor izquierdo y cursor derecho mientras enciende el SamplePad Pro. Esto no afectará a las muestras o kits almacenados en su tarjeta SD. 17 - Alesis SamplePad Pro | User Guide - Page 18
visiter alesis.com/samplepad-pro. Pour de l'assistance supplémentaire, veuillez visiter alesis.com/support. Schéma de connexion Pédale de grosse caisse* (« déclencheur ») Alimentation Lecteur multimédia* Appareil MIDI externe (clavier, module percussion, etc.*) Interrupteur au pied* Pad - Alesis SamplePad Pro | User Guide - Page 19
supérieur 1. Pad - Frappez ces pads à zone unique à l'aide d'une baguette. Lorsqu'un pad est frappé, une DEL autour du pad s'allume. 2. de Charleston variable. Nous recommandons d'utiliser la pédale DMHat d'Alesis avec le SamplePad Pro. 7. Entrée d'interrupteur au pied - Entrée permettant de - Alesis SamplePad Pro | User Guide - Page 20
MIDI OUT d'un appareil MIDI externe. 12. Sortie MIDI - Utilisez un câble MIDI à cinq broches afin de brancher cette sortie à l'entrée MIDI IN d'un appareil MIDI externe. 13. Port USB/MIDI - Ce port permet de brancher le SamplePad Pro . Assigner un échantillon à un pad ou à un déclencheur externe : - Alesis SamplePad Pro | User Guide - Page 21
é comme un échantillon de 3 Mo lorsqu'il est assigné à un pad). • Le répertoire racine peut contenir un maximum de 512 fichiers. • Lorsqu'un fichier .wav est sélectionné, cela prend quelques secondes pour le charger en mémoire. • Le SamplePad Pro prend en charge les fichiers .wav mono et stéréo avec - Alesis SamplePad Pro | User Guide - Page 22
provenant du même emplacement de déclenchement. • LOOP (boucle) Après qu'un pad ou un déclencheur externe est frappé, l'échantillon SamplePad Pro sont mis en sourdine. • TMP Frappez le pad ou le déclencheur externe plusieurs fois en mode TMP afin de régler le tempo du métronome. • CLK Frappez le pad - Alesis SamplePad Pro | User Guide - Page 23
paramètre MGRP et appuyez ensuite sur une des touches de déplacement horizontales afin de régler ce pad au même numéro que le premier pad. Menu Options Le menu Options du SamplePad Pro contient les réglages globaux qui affectent le fonctionnement global, ainsi que des informations et fonctions syst - Alesis SamplePad Pro | User Guide - Page 24
Touche permettant d'activer ou de désactiver le métronome. • Sound : Ce paramètre permet de sélectionner le type de MIDI par lequel le SamplePad Pro transmet les données MIDI. Les paramètres disponibles sont les canaux MIDI individuels 1 à 16. • Receive Program Changes : Définit si le SamplePad Pro - Alesis SamplePad Pro | User Guide - Page 25
ce mode, maintenez les deux touches de Curseur Gauches et Curseur Haut du SamplePad Pro enfoncées pendant deux secondes. Autre • Pad Curve : Définit la courbe de sensibilité à la dynamique (1 à 8) utilisée pour tous les pads internes. Vous pouvez entendre la courbe de sensibilité en frappant un - Alesis SamplePad Pro | User Guide - Page 26
sulla compatibilità, ecc.) recarsi alla pagina alesis.com/samplepad-pro. Per ulteriore assistenza sul prodotto, recarsi alla pagina alesis.com/support. Schema dei collegamenti Pad grancassa* ("Trigger") Alimentazione Media player* Dispositivo MIDI esterno (tastiera, modulo batteria, ecc - Alesis SamplePad Pro | User Guide - Page 27
pedale hi-hat variabile. si consiglia l'uso del pedale Alesis DMHat con il SamplePad Pro. 7. Ingresso interruttore a pedale - Collegare un interruttore a ed EXT 1B di ciascun kit sul SamplePad Pro. 9. Pad 2 - Collegare un pad batteria a zona singola, un pad piatti o un trigger a questo ingresso - Alesis SamplePad Pro | User Guide - Page 28
questo ingresso all'uscita MIDI OUT di un dispositivo MIDI esterno. 12. MIDI Out (uscita MIDI) - Servirsi di un cavo MIDI standard a cinque poli per collegare questa uscita all'ingresso MIDI di un dispositivo MIDI esterno. 13. Porta USB/MIDI Port - Collegare il SamplePad Pro a un computer per - Alesis SamplePad Pro | User Guide - Page 29
suonare. 7. Spostare il cursore sul parametro Sample Name (nome campione) premendo i tasti pad). • Il numero massimo di file che possono trovarsi nella directory principale è 512. • Quando un file .Wav viene selezionato, occorreranno pochi secondi per caricarlo nella memoria. • Il SamplePad Pro - Alesis SamplePad Pro | User Guide - Page 30
la nota MIDI inviata dalla sede trigger: 1. battere un pad o un trigger esterno. 2. Spostare il cursore sull'area MIDI premendo i loop, battere nuovamente il pad o il trigger esterno. • STOP Dopo aver battuto il pad o il trigger esterno, tutti i campioni attualmente riprodotti dal SamplePad Pro - Alesis SamplePad Pro | User Guide - Page 31
fino all'MGRP e servirsi dei tasti Cursore sinistro o Cursore destro per impostare questo pad sullo stesso numero impostato per il primo pad. Menu Opzioni Il menu Opzioni del SamplePad Pro contiene impostazioni globali che influiscono sul funzionamento complessivo, nonché su informazioni e sistemi - Alesis SamplePad Pro | User Guide - Page 32
il metronomo • Sound (suono): Seleziona SamplePad Pro. MIDI • Canale di ricezione: imposta il canale MIDI su cui il SamplePad Pro riceverà dati MIDI. I parametri disponibili sono All (tutti) o singoli canali MIDI 1-16. • Canale Send: imposta il canale MIDI cui il SamplePad Pro invierà dati MIDI - Alesis SamplePad Pro | User Guide - Page 33
tenere premuti il Cursore sinistro e il Cursore su del SamplePad Pro per due secondi. Altra • Curva pad: seleziona l'impostazione della sensibilità della curva di velocit Cursore sinistro e Cursore destro durante l'accensione del Sample Pad Pro. Ciò non influirà sui campioni o i kit memorizzati sulla scheda SD - Alesis SamplePad Pro | User Guide - Page 34
, Informationen zur Kompatibilität etc.) finden Sie auf alesis.com/samplepad-pro. Um weitere Unterstützung zu Ihrem Produkt zu erhalten, besuchen Sie alesis.com/support. Anschlussdiagramm Kick Pad* ("Trigger") Stromversorgung Media Player* Externes MIDI-Gerät (Keyboard, Drum-Modul etc.*) Fu - Alesis SamplePad Pro | User Guide - Page 35
verwenden. Wir empfehlen, Ihr Gerät mit dem Alesis DMHat Pedal zu verwenden. 7. Fußschaltereingang - SamplePad Pro zugeordnet sind. 9. Pad 2 - An diesen Eingang schließen Sie ein Single-Zonen-Drum-Pad, Becken-Pad oder Trigger mit einem 1/4" TS-Kabel an. Sie können diesen Eingang verwenden, um Samples - Alesis SamplePad Pro | User Guide - Page 36
MIDI-Kabel mit 5 Pins, um diesen Ausgang mit dem MIDI IN eines externen MIDI-Geräts zu verbinden. 13. USB/MIDI-Anschluss- Verbinden Sie SamplePad Pro mit einem Computer, um MIDI-Daten zu senden oder zu empfangen oder Samples blättern. Zuordnen eines Samples zu einem Pad oder einem externen Trigger: - Alesis SamplePad Pro | User Guide - Page 37
Pads oder eines externen Triggers einen Sound zu: 1. Bewegen Sie den Cursor zum Parameter Sample- Sample behandelt, wenn es einem Pad zugeordnet ist). • Die maximale Anzahl von Wave-Dateien im Stammverzeichnis ist 512. • Das Laden einer ausgewählten Wave-Datei dauert einige Sekunden. • SamplePad Pro - Alesis SamplePad Pro | User Guide - Page 38
Samples ein: 1. Schlagen Sie auf ein Pad MIDI-Bereich, indem Sie die Tasten Cursor Aufwärts oder Cursor Abwärts drücken. 3. Drücken Sie dann die Tasten Cursor Links oder Cursor Rechts, um die MIDI-Notennummer einzustellen. [00- 127] Hinweis: Die MIDI-Note hat keinen Einfluss auf den internen Sound - Alesis SamplePad Pro | User Guide - Page 39
nachdem es sein Ende erreicht hat, wiederholt. Um den Loop zu stoppen, schlagen Sie das Pad oder den ext. Trigger erneut an. • STOP Nachdem das Pad oder der ext. Trigger angeschlagen wurde, werden alle Samples, die derzeit von SamplePad Pro abgespielt werden, stumm geschaltet. • TMP Schlagen Sie das - Alesis SamplePad Pro | User Guide - Page 40
Optionsmenü Das Optionsmenü von SamplePad Pro enthält die globalen Einstellungen, die den gesamten um das Menü zu verlassen. Metronom • Schalter: Schaltet das Metronom ein oder aus. • Sound: Wählt den Sound des Metronoms aus folgenden Optionen: Metronom, Klangstäbe, Stöcke, Kuhglocke oder Piepton. • - Alesis SamplePad Pro | User Guide - Page 41
Parameter sind Ja und Nein. • Ext. Uhr: Legt fest, ob SamplePad Pro MIDI Clock sendet oder empfängt. Diese Funktion kann auch auf OFF gestellt werden. Laden von Samples/Kits via USB • Ist diese Funktion aktiviert, verbindet sich SamplePad Pro über den USB-Anschluss mit Ihrem Mac oder PC, um ein - Alesis SamplePad Pro | User Guide - Page 42
Werkseinstellung Um die internen Kits und globalen Einstellungen auf die Werkseinstellungen zurückzusetzen, halten Sie die Tasten Cursor Links und Cursor Rechts beim Einschalten des SamplePad Pro gedrückt. Dies wirkt sich nicht auf Samples oder Kits aus, die auf der SD-Karte gespeichert sind. 42 - Alesis SamplePad Pro | User Guide - Page 43
SD/SDHC cards up to 32 GB with a FAT32 file system Supported File Type: 16-bit, mono or stereo .WAV files with a sample rate of 48K, 44.1K, 32K, 22.05K, or 11.025K. Trademarks and Licenses Alesis is a trademark of inMusic Brands, Inc., registered in the U.S. and other countries. SD is a trademark - Alesis SamplePad Pro | User Guide - Page 44
alesis.com Manual Version 1.1
-
 1
1 -
 2
2 -
 3
3 -
 4
4 -
 5
5 -
 6
6 -
 7
7 -
8
-
9
-
10
-
11
-
12
-
13
-
14
-
15
-
16
-
17
-
18
-
19
-
20
-
21
-
22
-
23
-
24
-
25
-
26
-
27
-
28
-
29
-
30
-
31
-
32
-
33
-
34
-
35
-
36
-
37
-
38
-
39
-
40
-
41
-
42
-
43
-
44
 |
 |

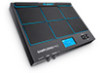
SAMPLEPAD PRO
User Guide
English ( 2 – 9 )
Guía del usuario
Español ( 10 – 17 )
Guide d’utilisation
Français ( 18 – 25 )
Guida per l'uso
Italiano ( 26 – 33 )
Benutzerhandbuch
Deutsch ( 34 – 42 )
Appendix
English ( 43 )