Alesis V-Mini User Guide - Page 4
Features - editor
 |
View all Alesis V-Mini manuals
Add to My Manuals
Save this manual to your list of manuals |
Page 4 highlights
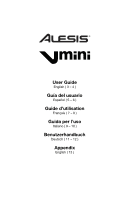
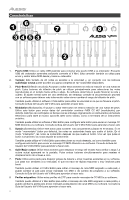
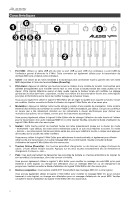
Features 6 1 7 8 34 5 3 2 1. USB Port: Use a standard USB cable to connect this USB port to your computer. The computer's USB port provides ample power to V Mini. This connection is also used to send and receive MIDI data to and from your computer. 2. Keyboard: The 25-note keyboard is velocity-sensitive and, in conjunction with the Octave Down/Up buttons, can access the full range of 127 available MIDI notes. 3. Pitch-Bend: Pressing and releasing these buttons mimics the rotation of a pitch wheel. These pitch bend buttons are primarily used to bend the notes played on the keyboard up or down. Your software determines if and how far you can bend the note. The usual setting is two semitones; however, you should refer to the documentation provided with your software for information about how to change the Pitch Bend range. You can also use the V Mini Editor software to edit how fast the pitch will bend. See the V Mini Editor's User Guide to learn how to do this. 4. Modulation: Pressing and releasing this button mimics the rotation of a modulation wheel. Use this button to send continuous controller data-MIDI CC #01 (modulation), by default. This type of realtime controller was originally introduced on electronic keyboard instruments to give the performer options such as adding vibrato, just like players of acoustic instruments do. You can also use the V Mini Editor software to set this button to send a different MIDI CC message to your software. See the V Mini Editor's User Guide to learn how to do this. 5. Sustain: Use this button to sustain all currently held notes on the keyboard. In "momentary" mode (default), the notes will sustain until you release the button. In "switch" mode, the notes will still sustain after you release the button. Once you press the button again, the notes will stop sustaining. You can also use the V Mini Editor to select your desired mode, as well as assign the button to send a different MIDI CC message to your software. See the V Mini Editor's User Guide to learn how to do this. 6. Octave Down/Up: Use these buttons to shift the keyboard's range up or down. When you are higher or lower than the center octave, the corresponding Octave button will light. Press both buttons simultaneously to reset the octave shift to "zero." 7. Pads: Use these pads to trigger drum hits or other samples in your software. The pads are velocitysensitive, which makes them very responsive and intuitive to play. You can also use the V Mini Editor software to edit the MIDI note message set to each pad, or you can change the pad to send MIDI CC messages or Program Change messages to your software. See the V Mini Editor's User Guide to learn how to do this. 8. Assignable Knobs: Use these 270° knobs to send MIDI CC messages to your software. You can also use the V Mini Editor software to edit the MIDI CC message set to each knob, or you can change the knob to send MIDI Channel aftertouch messages to your software. See the V Mini Editor's User Guide to learn how to do this. 4
-
 1
1 -
 2
2 -
 3
3 -
 4
4 -
 5
5 -
 6
6 -
 7
7 -
 8
8 -
 9
9 -
 10
10 -
11
-
12
-
13
-
14
-
15
-
16
 |
 |