Alesis Vortex Wireless 2 Vortex Wireless 2 - User Guide - Page 5
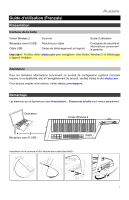
Connecting Wirelessly to the USB Receiver, Calibrating the Tilt Sensor, Editor Software, Restoring
 |
View all Alesis Vortex Wireless 2 manuals
Add to My Manuals
Save this manual to your list of manuals |
Page 5 highlights
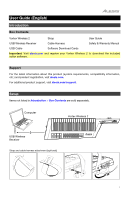
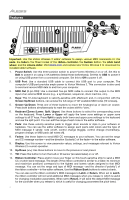
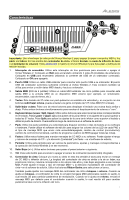
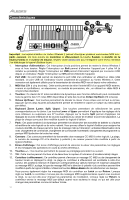
13. Ribbon Banks (1-3): Use these buttons to select any of the three banks of the ribbon controller. In each bank, the ribbon controller can send a different type of MIDI message, enabling you to send up to three different messages per preset. You can set the range (the values corresponding to its minimum and maximum positions) and type of MIDI message in the software editor. 14. Sustain: Press and hold this button to sustain any notes that are playing. Release the button to stop sustaining them. 15. Pitch Bend Wheel: Move this wheel to send MIDI pitch bend information. You can set the direction ("polarity") of the pitch bend wheel in the editor software. 16. Volume Slider: Move this slider to send a MIDI CC message. This control is set to volume (CC #7) by default, but you can edit the range and number of the CC message in the editor software. Operation Connecting Wirelessly to the USB Receiver Vortex Wireless 2 can send its MIDI messages wireless to the included USB receiver. Simply connect the USB receiver to a USB port on your computer. The USB receiver is always "paired" (wirelessly connected) to your Vortex Wireless 2, so no further steps are required. Calibrating the Tilt Sensor You can calibrate the range of the tilt sensor (accelerometer) so that it will activate and send MIDI data when Vortex Wireless 2 is tilted at a specified angle. To calibrate the tilt sensor: 1. Press and hold Tilt for 5 seconds. XY1 will appear in the display. 2. While watching the display, tilt Vortex Wireless 2 so that the number shown is in the 000-110 range. 3. When you have reached the desired "minimum" position, press Tilt. XY2 will appear in the display. 4. While watching the display, tilt Vortex Wireless 2 so that the number shown is in the 111-127 range. 5. When you have reached the desired "maximum" position, press Tilt. PAS will appear in the display for 3 seconds, and the calibration will be saved to Vortex Wireless 2. Editor Software Visit alesis.com and register your Vortex Wireless 2 to download the included editor software. Restoring the Default Settings You can erase all settings currently stored in your Vortex Wireless 2 and restore its original/default settings (a "factory reset"). To restore the default settings, press and hold the lowest C and Gb keys on the keyboard and use the power switch to power it on. 5
-
 1
1 -
 2
2 -
 3
3 -
 4
4 -
 5
5 -
 6
6 -
 7
7 -
 8
8 -
 9
9 -
 10
10 -
 11
11 -
12
-
13
-
14
-
15
-
16
-
17
-
18
-
19
-
20
 |
 |