Alpine CDA 9856 Owners Manual - Page 20
MP3/WMA, External Device - features
 |
UPC - 793276711274
View all Alpine CDA 9856 manuals
Add to My Manuals
Save this manual to your list of manuals |
Page 20 highlights
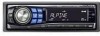
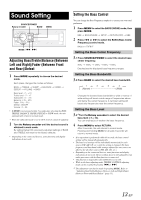
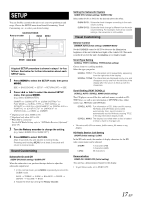
MP3/WMA Playing MP3/WMA Data (PLAY MODE) CDDA (Initial setting) / CDDA/MP3 This product can playback CDs containing both CD and MP3/WMA data. However, in some situations (some enhanced CDs), playback may be difficult. For these special cases, you can select playback of CD data only. When a disc contains both CD or the MP3/WMA data, playback starts from the CD data portion of the disc. CDDA: CDDA/MP3: Only CD data can be played back. Both CD data and MP3/WMA file tracks can be played back. • Perform this setting before inserting a disc. If a disc has already been inserted, perform the setting after you remove the disc. (If you use an MP3 changer, you have to change discs.) External Device Turning Mute Mode On/Off (INT MUTE) MUTE ON (Initial setting) / MUTE OFF If a device having the interrupt feature is connected, audio will be automatically muted whenever the interrupt signal is received from the device. Setting the AUX Mode (V-Link) AUX IN ON / AUX IN OFF (Initial setting) You can input TV/video sound by connecting an optional Ai-NET/RCA Interface cable (KCA-121B) or Versatile Link Terminal (KCA-410C) to this component. You can change the AUX name display when AUX IN ON is set. Select the AUX name by pressing or . Then press MODE. If the KCA-410C is connected, it is possible to select two AUX names. • Via KCA-410C, up to 2 external devices with RCA output can be connected. In this case, press SOURCE/POWER to select AUX mode and then press BAND to select your desired device. Setting the External Digital Input (DIGITAL AUX) D-AUX ON / D-AUX OFF (Initial setting) When an ALPINE Ai-NET compatible digital audio processor and a DVD player (DVE-5207) not compatible with Ai-NET are connected, set D-AUX to ON to enjoy 5.1-channel surround sound. • After setting D-AUX to ON, make the setting in "Connecting an Optical Digital Compatible Audio Processor and an Ai-NET NonCompatible DVD Player." • Press SOURCE/POWER, and select the D-AUX mode, and adjust the volume, etc. • Depending on the connected audio processor, DVD player sound may continue to be output, even though the source is changed to another one. If this occurs, set the DVD player's power to OFF. Connecting to an External Amplifier POWER IC ON (Initial setting) / POWER IC OFF When an external amplifier is connected, sound quality can be improved by stopping the power supply of the built-in amplifier. POWER IC OFF : Use this mode when the front and rear preamplifier of the unit are used to drive an external amplifier connected to the speakers. In this setting, the head unit's internal amplifier has no output to drive speakers. Amplifier Amplifier Front left Front right Rear left Rear right POWER IC ON : The speakers are driven by the built-in amplifier. SPEAKER RIGHT FRONT Speakers Front right SPEAKER RIGHT REAR Rear right SPEAKER LEFT REAR Rear left SPEAKER LEFT FRONT Front left • No sound is produced by the system when the power output is set to OFF. 18-EN
-
 1
1 -
2
-
3
-
4
-
5
-
6
-
7
-
8
-
9
-
10
-
11
-
12
-
13
-
14
-
 15
15 -
 16
16 -
 17
17 -
 18
18 -
 19
19 -
 20
20 -
 21
21 -
 22
22 -
 23
23 -
 24
24 -
 25
25 -
26
-
27
-
28
-
29
-
30
-
31
-
32
-
33
-
34
-
35
-
36
 |
 |