Alpine CDE-152 Owners Manual - Page 9
Radio
 |
View all Alpine CDE-152 manuals
Add to My Manuals
Save this manual to your list of manuals |
Page 9 highlights
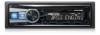
Adjusting Volume Turn the Rotary encoder until the desired sound is obtained. Setting Time 1 Press and hold AUDIOSETUP for at least 2 seconds to activate the SETUP selection mode. 2 Turn the Rotary encoder to select GENERAL, and then press ENTER. 3 Turn the Rotary encoder to select the CLOCK ADJ mode, and then press ENTER. The time indication will blink. 4 Turn the Rotary encoder to adjust the hours while the time indication is blinking. 5 When the hour has been adjusted, press ENTER. 6 Turn the Rotary encoder to adjust the minutes while the time indication is blinking. 7 Press and hold AUDIOSETUP for at least 2 seconds to return to normal mode. Notes • To synchronize the clock to another clock/watch or radio time announcement, press and hold ENTER for at least 2 seconds after setting the "hour". Minutes will reset to "00". If the display shows over "30" minutes when you do this, the time will advance one hour. • Pressing t will return to the previous mode. • Pressing and holding r for at least 2 seconds will return to normal mode. • If no operation is performed for 60 seconds, the unit will return to normal mode automatically. Controllable with Remote Control This unit can be controlled with an optional Alpine remote control. For details, consult your Alpine dealer. Point the optional remote control transmitter at the remote-control sensor. Remote control sensor Radio SOURCE/ Rotary encoder /ENTER BAND TUNE/A.ME Preset buttons (1 through 6) Listening to Radio 1 Press SOURCE to select TUNER mode. 2 Press BAND repeatedly until the desired radio band is displayed. F1 (FM1) F2 (FM2) AM F1 (FM1) 3 Press TUNEA.ME to select the tuning mode. SEEK DX (Distance mode) SEEK LOCAL (Local mode) MANUAL (Manual mode) SEEK DX Distance mode (Initial setting): Both strong and weak stations will be automatically tuned in (Automatic Seek Tuning). The " " indicator lights up. Local mode: Only strong stations will be automatically tuned in (Automatic Seek Tuning). Manual mode: The frequency is manually tuned in steps (Manual tuning). 4 Press or to tune in the desired station. In Manual mode, holding down or will change the frequency continuously. Presetting Stations Manually 1 Select the radio band and tune in a desired radio station you wish to store in the preset memory. 2 Press and hold for at least 2 seconds, any one of the preset buttons (1 through 6) into which you wish to store the station. The selected station is stored. The display shows the band, preset number and station frequency memorized. Notes • A total of 18 stations can be stored in the preset memory (6 stations for each band; FM1, FM2 and AM). • If you store a station in a preset memory which already has a station, the current station will be cleared and replaced with the new station. 9-EN
-
 1
1 -
2
-
3
-
 4
4 -
 5
5 -
 6
6 -
 7
7 -
 8
8 -
 9
9 -
 10
10 -
 11
11 -
 12
12 -
 13
13 -
 14
14 -
15
-
16
-
17
-
18
-
19
-
20
-
21
-
22
-
23
-
24
-
25
-
26
-
27
-
28
-
29
-
30
-
31
-
32
-
33
-
34
-
35
-
36
-
37
-
38
-
39
-
40
-
41
-
42
-
43
-
44
-
45
-
46
-
47
-
48
-
49
-
50
-
51
-
52
-
53
-
54
-
55
-
56
-
57
-
58
-
59
-
60
-
61
-
62
-
63
-
64
-
65
-
66
-
67
-
68
 |
 |
