Alpine IVE-W535HD Owner's Manual (english) - Page 57
Direct Camera Setting, Setting the Camera Input - owner s manual
 |
View all Alpine IVE-W535HD manuals
Add to My Manuals
Save this manual to your list of manuals |
Page 57 highlights
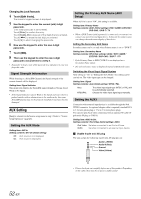
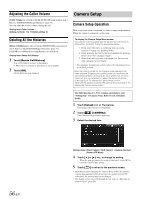
Direct Camera Setting [Direct Camera] is selected on the Camera setup menu in step 3. Refer to "Camera Setup Operation" (page 56). Setting the Camera Input Setting item: Camera Select / Guide Adjustment*1 Setting contents: Off (Initial setting) / Front / Rear*2 Rear: Front: Rear camera Front camera *1 If "Camera Select" is set to "Off", this option is not available. *2 If "Camera Select" in AUX Camera Setting is set to "Rear," "Rear" cannot be set in Direct Camera Setting. Switching video patterns for Rear camera & Front camera The video pattern can be changed when connected to HCE-C200R/ HCE-C200F/HCE-C210RD/HCE-C212F. Setting item: Guide Adjustment 1 Touch [Guide Adjustment]. The camera guide adjustment screen is displayed. 2 Touch [Back], [Panorama], [Corner], or [Top]. The view will change to the selected view. • [Back] will not appear for the Front camera. 3 Touch [ ] to return to the previous screen. • For an explanation of video patterns, see the camera Owner's Manual. Adjusting the Rear/Front Camera Guide If you select "Rear" or "Front," you can adjust the camera guide position. Setting item: Guide Adjustment 1 Touch [Guide Adjustment]. The camera guide adjustment screen is displayed. • If the video pattern is set to "Corner," the camera guide will not be displayed. 2 Touch [Adjust]. • If [Adjust] does not appear, proceed to step 3. 3 Touch the guide you intend to adjust. Guide line can also be selected by touching [ ] [ ]. Display example for rear camera mode Display example for front camera mode 4 Touch or [ ] to adjust the position of the guide. • Touching [Clear] clears adjustments and returns to the setting before guide line alteration. 5 After the adjustment is completed, touch [Set]. Adjusting guides simultaneously (for Rear camera only) 1 Touch [Link]. The 3 vertical guides of the currently-selected guide link together, allowing them to be adjusted simultaneously. Turning guide display ON/OFF Turning the selected guide off. 1 Touch [ON/OFF]. The currently selected guide will turn off. 2 To turn the guide on, touch [ON/OFF] again. • Guides that are turned off are still adjustable. Returning guides to default 1 Touch [Default]. A message window will appear. 2 Touch [OK]. Adjusted values will return to default settings. 57-EN
-
 1
1 -
2
-
3
-
4
-
5
-
6
-
7
-
8
-
9
-
10
-
11
-
12
-
13
-
14
-
15
-
16
-
17
-
18
-
19
-
20
-
21
-
22
-
23
-
24
-
25
-
26
-
27
-
28
-
29
-
30
-
31
-
32
-
33
-
34
-
35
-
36
-
37
-
38
-
39
-
40
-
41
-
42
-
43
-
44
-
45
-
46
-
47
-
48
-
49
-
50
-
51
-
 52
52 -
 53
53 -
 54
54 -
 55
55 -
 56
56 -
 57
57 -
 58
58 -
 59
59 -
 60
60 -
 61
61 -
 62
62 -
63
-
64
-
65
-
66
-
67
-
68
-
69
-
70
-
71
-
72
-
73
-
74
-
75
-
76
-
77
-
78
-
79
-
80
-
81
-
82
-
83
-
84
-
85
-
86
-
87
-
88
-
89
-
90
-
91
-
92
-
93
-
94
-
95
-
96
-
97
-
98
-
99
-
100
-
101
-
102
-
103
-
104
-
105
-
106
-
107
-
108
 |
 |
