Alpine KTX-C10LP Installation Manual - Page 3
Special, Instructions - install
 |
UPC - 793276410221
View all Alpine KTX-C10LP manuals
Add to My Manuals
Save this manual to your list of manuals |
Page 3 highlights
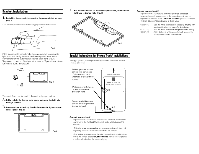
Bracket Installation 1. Install the license plate frame using the appropriate 4 screws. (Fig. 4) • Use either the machine screws or the self-tapping screws Ihal are included. ~-- ~~(~?~=~l!rY_: L Fig. 4 If the license plate frame blocks the automobile's license plate light, connect the light wire of the license plate frame, to the connectors for the automobile's license plate light. (Fig. 5) To prevent corrosion of the light wire, refer to "Special Instructions for Pickup Truck* Installations" GND Fig. 5 There are 3 options for routing the wire to the connectors: A. Drill a hole in the license plate frame and route the light wire through the hole. B. Route the light wire along the slot between the light case and license plate. (Fig. 6) 10]· •0 Fig. 6 c. File the marked area on the license plate frame, and route the light wire to the top hole. (Fig. 7) Special Instructions for Pickup Truck* Installations * Any type a/vehicle. including pickup trucks. where the connector is instal/ed outside a/the cabin. Rubber grommet to pass camera wire from inside of pickup truck* cab to underside of pickup truck* chassis t Front of pickup truck" White connector between back-up camera and extension cable Recommended Back-up camera mounting location (on rear bumper) Special Instruction #1 In pickup truck* installations. the wire that connects between the camera and the AV Head Unit typically gets installed under the chassis. -This wire must be protected from damage using split-loom tubing in any areas where it is installed under the chassis. -The rubber grommet where the wire passes from the vehicle interior to the vehicle exterior must be sealed with silicone to prevent moisture intrusion into the vehicle interior. Special Instruction #2 In pickup truck' installations, the white electrical connector between the back-up camera and the extension cable may be exposed to moisture. If so, it must be sealed to prevent corrosion. This can be accomplished in one of three ways: Option #1) Option #2) Option #3) Seal the white connector by wrapping it tightly with good quality electrical tape after installation. Seal the white connector using heat-shrink tubing. Apply dielectric white grease to both sides of the white connector before installation
-
 1
1 -
 2
2 -
 3
3 -
 4
4 -
 5
5
 |
 |