Alpine KTX-FUS8 Installation Manual - Page 3
Mounting the New Stereo, the Perfect Fit Panel 7344. Remove
 |
View all Alpine KTX-FUS8 manuals
Add to My Manuals
Save this manual to your list of manuals |
Page 3 highlights
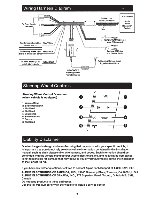
Mounting The Stereo • 1. From the back side of the OEM Factory Stereo AIC control stack, extract (4) T-20 Torx Head screws to remove the A/C control assembly. Re-attach A/C control assembly to the Perfect Fit Panel 7344. Remove the clips from the factory stereo panel and attach them to panel7344. 2. Attach panels 7345 and 7346 to the Alpine head unit using the supplied screws (that come with the head unit). 3. Plug in the supplied radio harnesses and steering wheel controls. Run Bluetooth mic & GPS antenna, and install foot brake and parking brake wires. 4. Connect and mount the stereo in the dash. (The main kit panel mounts to the dash over the stereo). Re-connect the Factory HVAC & misc. controls. Panel 7344 mounts to the dash over the radio. 3
-
 1
1 -
 2
2 -
 3
3 -
 4
4 -
 5
5 -
 6
6 -
 7
7
 |
 |
