Alpine KTX-GM8K2 Installation Instructions - Page 2
Factory Stereo Removal, Mounting The Stereo Continued, Steering Wheel Controls, Mounting The Stereo
 |
View all Alpine KTX-GM8K2 manuals
Add to My Manuals
Save this manual to your list of manuals |
Page 2 highlights
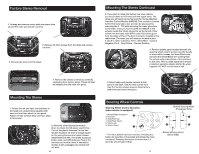
Factory Stereo Removal 1. Unsnap and remove center dash trim piece from around the radio and climate controls. 2. Remove (4) 7mm screws from the radio and climate controls. 3. Remove the tuner and CD player. Mounting The Stereo Continued 3. If you wish to retain the factory rear view camera you must solder an RCA end onto the signal wires. The wires you will need can be found at the Human Machine Interface Control Module (HMICM). This module is located behind the lower glove box and can be accessed by removing the 4 - T15 bolts securing the lower glove box to the dash. Once you have located the HMICM in the vehicle, locate the 12 pin connector on the far left. If the vehicle has the base radio (RPO code IO3 behind glove box) the wires will be in the 8 pin connector located at the radio brain. The wires you will need are located in pins 5 and 6 in either connector. Pin 6 - White/Blue - Camera Negative, Pin 5 - Grey/Yellow - Camera Positive. 4. Remove plastic panel located beneath the steering wheel column and access the bundle of wires which houses the Green/Black wire. Connect the Green/Black wire coming from the vehicle side connections of the interface to this wire. This is a data signal so to ensure consistent operation please solder the wires together. DO NOT cut this wire in half. 4. Remove the climate controls by carefully unclipping from factory panel. These will later be installed into the main trim panel. Mounting The Stereo 1. Attach the left and right side brackets to the head unit using screws supplied with head unit and then attach to trim panel. Attach climate controls (from previous step) to trim panel. 2. Move the silver telematics module down to where the CD player used to be. Cut out the plastic between the top two module locations so there's enough space for the wiring harness and radio chassis. Install Bluetooth Mic, foot brake & parking brake wires, and GPS antenna. Plug in the harness and module. Note: If telematics module is left unplugged, the vehicle will not start. 2 5. Mount radio and climate controls in trim panel in the dash. Use (4) 7mm screws from step 2 of factory stereo removal. Snap factory dash trim piece back into place. Steering Wheel Controls Steering Wheel Control Operation (when vehicle is equipped) 1. Mute/OnStar Activation** 2. End Call 1 3. Seek/Track Up 4. Seek/Track Down 5. Volume Up 6. Volume Down 2 ** The Voice button has two functions. Pressing this button for less than 1.5 seconds will initiate the mute command. Pressing this button for more than 1.5 seconds will activate OnStar. 3 Behind steering wheel (Passenger Side) 3 5 4 6 Behind steering wheel (Driver Side)
-
 1
1 -
 2
2
 |
 |
