Alpine KTX-VW8 User Guide - Page 2
Factory Stereo Removal 2011, Jetta, Passat
 |
View all Alpine KTX-VW8 manuals
Add to My Manuals
Save this manual to your list of manuals |
Page 2 highlights
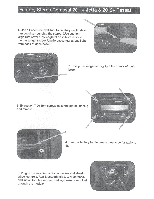
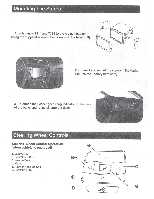
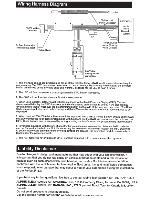
Factory Stereo Removal 2011+ Jetta &2012+ Passat 1. Use a Panel Removal Tool to carefully unclip dash trim bezel surrounding the stereo. (Use caution; large trim bezel runs length of dash from radio to the passenger's side). Unclip passenger airbag light from back of dash bezel. 2. Unclip passenger airbag light from back of dash bezel. 3. Extract (4) T-20 Torx screws securing stereo, unplug and remove. 4. Remove factory tab to create clearance for radio to fit. 5. Plug in the supplied radio harnesses and steering wheel controls. Run Bluetooth mic & GPS antenna, and install foot brake wire. Parking brake is supplied through the module.
-
 1
1 -
 2
2 -
 3
3 -
 4
4
 |
 |

Factory Stereo Removal 2011+
Jetta
&
2012+ Passat
1. Use a Panel Removal Tool
to
carefully unclip dash
trim bezel surrounding
the
stereo. (Use caution;
large trim bezel runs length
of
dash from radio
to
the
passenger's side). Unclip passenger airbag light
from
back
of
dash bezel.
2.
Unclip passenger airbag light from
back
of
dash
bezel.
3.
Extract
(4)
T-20 Torx screws securing stereo, unplug
and remove.
4.
Remove factory
tab
to
create clearance
for
radio
to
fit.
5. Plug in the supplied radio harnesses and steering
wheel controls. Run Bluetooth
mic
& GPS antenna,
and install
foot
brake wire. Parking brake is supplied
through the module.