Alpine X109-WRA Installation Manual english - Page 9
Installation Instructions
 |
View all Alpine X109-WRA manuals
Add to My Manuals
Save this manual to your list of manuals |
Page 9 highlights
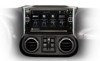
WRANGLER Jeep Wrangler ˜ 9/15 Installation Instructions 1 The factory dash panel needs to be trimmed to allow the new X109-WRA bezel to fit into place. Remove the highlighted area by cutting along the dashed line. 2 Remove the vents from the radio section on the OEM dash panel by pressing down on the lock tab and turning right. Mount vents on to the X109-WRA bezel. Lock tab 3 Use a cutting tool to trim the highlighted area shown below. Rear view 4 Mount the microphone as illustrated and run the cable to the radio cavity. 5 Plug the OBDII connector on to the OBDII port below the driver side dash and run the extension to the radio cavity. 6 Attach the Maestro to the main harness.
-
 1
1 -
2
-
3
-
 4
4 -
 5
5 -
 6
6 -
 7
7 -
 8
8 -
 9
9 -
 10
10 -
 11
11 -
 12
12 -
 13
13 -
 14
14 -
15
 |
 |

Jeep Wrangler
WRANGLER
±
9/15
Installation Instructions
2
Remove the vents from the radio section on the
OEM dash panel by pressing down on the lock tab
and turning right. Mount vents on to the X109-WRA
bezel.
Lock tab
Rear view
4
Mount the microphone as illustrated and run the
cable to the radio cavity.
6
Attach the Maestro to the main harness.
1
The factory dash panel needs to be trimmed to
allow the new X109-WRA bezel to fit into place.
Remove the highlighted area by cutting along the
dashed line.
3
Use a cutting tool to trim the highlighted area
shown below.
5
Plug the OBDII connector on to the OBDII port
below the driver side dash and run the extension to
the radio cavity.