Alpine iLX-F309TCM Installation Manual - Page 8
Installation Instructions Continued
 |
View all Alpine iLX-F309TCM manuals
Add to My Manuals
Save this manual to your list of manuals |
Page 8 highlights
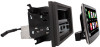
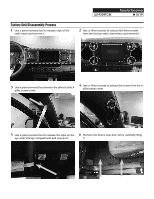
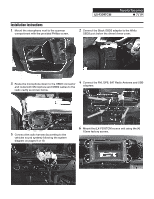
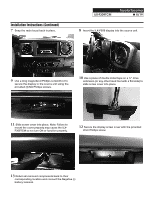
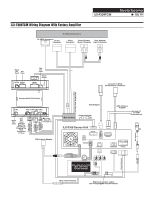
Installation Instructions (Continued) 7 Snap the radio bezel back in place. iLX-F309TCM Toyota Tacoma ˜ 8/19 8 Insert the iLX-F309 display into the source unit 9 Use a long magnetized Phillips screwdriver to secure the display to the source unit using the provided (4) M4 Phillips screws. 10 Use a piece of double sided tape on a ¼" drive extension (or any other hand tool with a flat side) to slide screw cover into place. 11 Slide screw cover into place. Note: Failure to mount the cover properly may cause the iLX- F309TCM to not turn ON or function properly. 12 Secure the display screw cover with the provided 2mm Phillips screw. 13 Return all removed components back to their corresponding location and connect the Negative (-) battery terminal.
-
 1
1 -
2
-
 3
3 -
 4
4 -
 5
5 -
 6
6 -
 7
7 -
 8
8 -
 9
9 -
 10
10 -
 11
11 -
 12
12 -
 13
13 -
14
-
15
-
16
-
17
-
18
-
19
 |
 |
