Amana A8WXNGFWH Use and Care - Page 12
Refrigerator Care
 |
UPC - 883049159232
View all Amana A8WXNGFWH manuals
Add to My Manuals
Save this manual to your list of manuals |
Page 12 highlights
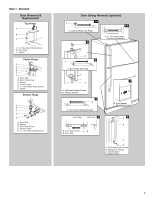
6. Reassemble the storage tank. Fasten the valve into the storage tank by turning it clockwise. Insert the cap strap onto the tank cover and place the cover over the tank. Make sure: ■ The valve stop is touching the stop in the storage tank. ■ The insulation ring is positioned correctly on the tank. 7. Holding the storage tank with both hands, tilt it slightly upwards and hook it onto the projections from the interior wall and push it down until the storage tank is firmly in place. IMPORTANT: Make sure the storage tank is firmly attached to the door. Drip Tray The drip tray collects drips from the beverage dispenser. As needed, the drip tray can be removed to empty and clean. To remove and replace the drip tray: ■ Remove the drip tray by pulling it directly outward from the door. ■ Replace the drip tray by placing it in position and pushing it in toward the door. REFRIGERATOR CARE Cleaning WARNING Explosion Hazard Use nonflammable cleaner. Failure to do so can result in death, explosion, or fire. Both the refrigerator and freezer sections defrost automatically. However, clean both compartments about once a month to avoid buildup of odors. Wipe up spills immediately. IMPORTANT: ■ Because air circulates between both sections, any odors formed in one section will transfer to the other. You must thoroughly clean both sections to eliminate odors. To avoid odor transfer and drying out of food, wrap or cover foods tightly. ■ For stainless steel models, stainless steel is corrosionresistant and not corrosion-proof. To help avoid corrosion of your stainless steel, keep your surfaces clean by using the following cleaning instructions. To Clean Your Refrigerator: NOTE: Do not use abrasive or harsh cleaners such as window sprays, scouring cleansers, flammable fluids, muriatic acid, cleaning waxes, concentrated detergents, bleaches or cleansers containing petroleum products on exterior surfaces (doors and cabinet), plastic parts, interior and door liners or gaskets. Do not use paper towels, scouring pads, or other harsh cleaning tools. 1. Unplug refrigerator or disconnect power. 2. Hand wash, rinse, and dry removable parts and interior surfaces thoroughly. Use a clean sponge or soft cloth and a mild detergent in warm water. 3. Clean the exterior surfaces. Painted metal: Wash painted metal exteriors with a clean, soft cloth or sponge and a mild detergent in warm water. Rinse surfaces with clean, warm water and dry immediately to avoid water spots. Stainless steel: Wash stainless steel surfaces with a clean, soft cloth or sponge and a mild detergent in warm water. Rinse surfaces with clean, warm water and dry immediately to avoid water spots. NOTE: When cleaning stainless steel, always wipe with the grain to avoid cross-grain scratching. 4. Clean the condenser coils regularly. Coils may need to be cleaned as often as every other month. This may help save energy. ■ Pull refrigerator out away from the wall. See "Unpack the Refrigerator." ■ Vacuum coils when they are dusty or dirty. ■ Roll refrigerator back into place. Make sure to leave 1" (2.5 cm) between the cabinet back and the wall. ■ Check to see that the refrigerator is level. 5. Plug in refrigerator or reconnect power. 12
-
 1
1 -
2
-
3
-
4
-
5
-
6
-
 7
7 -
 8
8 -
 9
9 -
 10
10 -
 11
11 -
 12
12 -
 13
13 -
 14
14 -
 15
15 -
 16
16 -
 17
17 -
18
-
19
-
20
-
21
-
22
-
23
-
24
-
25
-
26
-
27
-
28
-
29
-
30
-
31
-
32
-
33
-
34
-
35
-
36
-
37
-
38
-
39
-
40
-
41
-
42
-
43
-
44
-
45
-
46
-
47
-
48
 |
 |
