Amana ASI2575GRS use - Page 3
Ice And Water
 |
View all Amana ASI2575GRS manuals
Add to My Manuals
Save this manual to your list of manuals |
Page 3 highlights
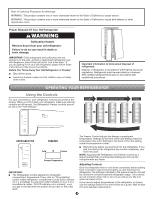
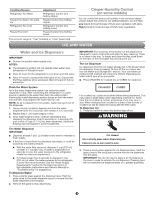
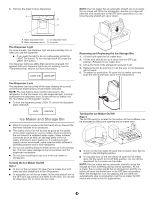
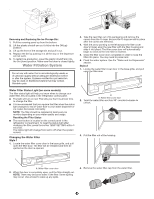
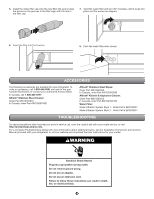
Condition/Reason: Refrigerator Too Warm Freezer Too Warm/ Too Little Ice Refrigerator Too Cold Freezer Too Cold Adjustment: Refrigerator Control One Setting Higher Freezer Control One Setting Higher Refrigerator Control One Setting Lower Freezer Control One Setting Lower The set point range is "1 bar" (coldest) to "5 bar" (least cold). Crisper Humidity Control (on some models) You can control the amount of humidity in the moisture-sealed crisper. Adjust the control to any setting between Low and High. Low (open) for best storage of fruits and vegetables with skins. High (closed) for best storage of fresh, leafy vegetables. ICE AND WATER Water and Ice Dispensers IMPORTANT: ■■ Connect to potable water supply only. NOTES: ■■ The dispensing system will not operate when either door (refrigerator or freezer) is open. ■■ Allow 24 hours for the refrigerator to cool down and chill water. ■■ Allow 24 hours to produce the first batch of ice. Discard the first three batches of ice produced. Wait 72 hours for full ice production. Flush the Water System Air in the water dispensing system can cause the water dispenser to drip. After connecting the refrigerator to a water source or replacing the water filter, flush the water system. Flushing the water dispensing system forces air from the water line and filter, and prepares the water filter for use. NOTE: As air is cleared from the system, water may spurt out of the dispenser. 1. Using a sturdy container, depress and hold the water dispenser lever for 5 seconds, then release it for 5 seconds. 2. Repeat Step 1 until water begins to flow. 3. Once water begins to flow, continue depressing and releasing the dispenser lever (5 seconds on, 5 seconds off) until a total of 3 gal. (11.4 L) has been dispensed. Additional flushing may be required in some households. The Water Dispenser IMPORTANT: ■■ Dispense at least 1 qt (1 L) of water every week to maintain a fresh supply. ■■ If the flow of water from the dispenser decreases, it could be caused by low water pressure. ■■ With the water filter removed, dispense 1 cup (237 mL) of water. If 1 cup (237 mL) of water is dispensed in 8 seconds or less, the water pressure to the refrigerator meets the minimum requirement. ■■ If it takes longer than 8 seconds to dispense 1 cup (237 mL) of water, the water pressure to the refrigerator is lower than recommended. See the "Water Supply Requirements" section (in the User Instructions or the Installation Instructions and Owner's Manual) or "Troubleshooting" for suggestions. To Dispense Water: 1. Press a sturdy glass against the dispenser lever. Hold the glass close to the water dispenser spout to ensure that the water dispenses into the glass. 2. Remove the glass to stop dispensing. IMPORTANT: The small tray at the bottom of the dispenser is designed to catch small spills and allow for easy cleaning. There is no drain in the tray. To empty and clean the tray, push down on the back of the removable tray lid and pull it out. The Ice Dispenser Ice dispenses from the ice maker storage bin in the freezer when the dispenser lever is pressed. To turn off the ice maker, see the "Ice Maker and Storage Bin" section. Your ice maker can produce both crushed and cubed ice. Before dispensing ice, select which type of ice you prefer. ■■ Press CRUSHED for crushed ice, or CUBED for cubed ice. For crushed ice, cubes are crushed before being dispensed. This may cause a slight delay when dispensing crushed ice. Noise from the ice crusher is normal, and pieces of ice may vary in size. When changing from crushed to cubed, a few ounces of crushed ice will be dispensed along with the first cubes. To Dispense Ice: 1. Press the button to select the desired type of ice. WARNING Cut Hazard Use a sturdy glass when dispensing ice. Failure to do so can result in cuts. 2. Press a sturdy glass against the ice dispenser lever. Hold the glass close to the ice guide to ensure that the ice dispenses into the glass. IMPORTANT: You do not need to apply a lot of pressure to the lever in order to activate the ice dispenser. Pressing hard will not make the ice dispense faster or in greater quantities. 3
-
 1
1 -
 2
2 -
 3
3 -
 4
4 -
 5
5 -
 6
6 -
 7
7 -
 8
8 -
 9
9 -
10
-
11
-
12
-
13
-
14
-
15
-
16
 |
 |
