Antec P280 White Manual - Page 16
additional 5.25 drive bays, please remove the metal cover adjacent to the plastic drive
 |
View all Antec P280 White manuals
Add to My Manuals
Save this manual to your list of manuals |
Page 16 highlights
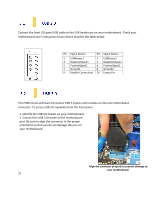
4. Now that your drive is secure to the tray, pinch the ends of the tray and insert your drive into the bay. You will hear your device click into place. To install a 2.5" drive: Pinch the ends of the tray and insert your drive until it clicks. 1. Extract one of the drive trays by pinching the ends of the tray inward and pulling the drive tray out. 2. 2. Place your 2.5" drive on the tray so that the holes line up with the 2.5" tray holes. 3. Using the 2.5" drive screws (F in Section 1.3), secure your 3.5" drive to the tray with a screwdriver. 4. Now that your drive is secure to the tray, pinch the ends of the tray and insert your drive into the bay. You will hear your device click into place. **If you need to install additional 5.25" drive bays, please remove the metal cover adjacent to the plastic drive bay cover. 14
-
 1
1 -
2
-
3
-
4
-
5
-
6
-
7
-
8
-
9
-
10
-
 11
11 -
 12
12 -
 13
13 -
 14
14 -
 15
15 -
 16
16 -
 17
17 -
 18
18 -
 19
19 -
 20
20 -
 21
21 -
22
-
23
-
24
-
25
-
26
 |
 |
