Ariens Classic LM 21 Owners Manual - Page 25
Troubleshooting, Probable Cause
 |
View all Ariens Classic LM 21 manuals
Add to My Manuals
Save this manual to your list of manuals |
Page 25 highlights
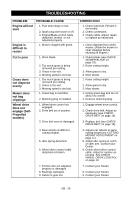
TROUBLESHOOTING PROBLEM Engine will not start Engine is difficult to restart PROBABLE CAUSE 1. Fuel tank empty or low. 2. Spark plug wire loose or off. 3. Engine/Blade control cable detached, broken, or not adjusted properly. 1. Mower clogged with grass. Cut is poor 1. Worn blade. Grass does not disperse evenly Mower does not bag clippings Wheel drive does not engage (SelfPropelled models) 2. Too much grass is being removed per cutting. 3. Grass is too wet. 4. Mowing speed is too fast. 1. Too much grass is being removed per cutting. 2. Grass is too wet. 3. Mowing speed is too fast. 1. Grass bag is overfilled. 2. Mulching plug is installed. 1. Wheel drive control not engaged. 2. Drive belt out of position. 3. Drive belt worn or damaged. 4. Rear wheels at different cutting heights. 5. Idler spring detached. 6. Wheel drive control cable detached or broken. 7. Friction disc not adjusted properly or damaged. 8. Bearings damaged. 9. Debris in gear set. CORRECTION 1. Check fuel level. Fill tank if necessary. 2. Check connection. 3. Check cable. Adjust, repair or replace as necessary. 1. Clear clippings from under mower. (Allow the mower to clear clippings before shutting off engine.) 1. Check blade (see CHECK MOWER BLADE on page 18). 2. Raise cutting height. 3. Allow grass to dry. 4. Mow slower. 1. Raise cutting height. 2. Allow grass to dry. 3. Mow slower. 1. Empty grass bag and do not allow it to overfill. 2. Remove mulching plug. 1. Engage wheel drive control. 2. Check drive belt. Adjust as necessary (see CHECK DRIVE BELT on page 19). 3. Replace belt (see CHECK DRIVE BELT on page 19). 4. Adjust rear wheels to same cutting height (see CUTTING HEIGHT ADJUSTMENT on page 11). 5. Attach idler spring to notch on idler arm. Contact your Dealer. 6. Check wheel drive control cable. Adjust or replace as needed. See CHECK WHEEL DRIVE CONTROL on page 18. 7. Contact your Dealer. 8. Contact your Dealer. 9. Contact your Dealer. GB - 25
-
 1
1 -
2
-
3
-
4
-
5
-
6
-
7
-
8
-
9
-
10
-
11
-
12
-
13
-
14
-
15
-
16
-
17
-
18
-
19
-
 20
20 -
 21
21 -
 22
22 -
 23
23 -
 24
24 -
 25
25 -
 26
26 -
 27
27 -
 28
28 -
 29
29 -
 30
30 -
31
-
32
 |
 |
