Ariens Pro Zoom 60 Owners Manual - Page 31
Cleaning the Battery, Battery Electrolyte First Aid, Jump-Starting, Replacing Fuses, CASTERS
 |
View all Ariens Pro Zoom 60 manuals
Add to My Manuals
Save this manual to your list of manuals |
Page 31 highlights
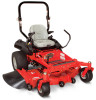
5. Install the red terminal boot over both the positive post and the positive cable. 6. Secure the battery in place by inserting one end of the hook band into the battery tray and running the other end over the top of the battery into the slot on the opposite end of the battery tray. Cleaning the Battery Keep battery and its terminals clean. Inspect every 100 operating hours or monthly for best performance. 1. Positive terminal 2. Negative terminal Figure 19 OM4316 1. Remove battery from unit. See Removing the Battery on page 30 2. Clean terminals and battery cable ends with wire brush. 3. Coat terminals with dielectric grease or petroleum jelly. 4. Replace battery. (See Installing the Battery on page 30) CHARGING THE BATTERY Battery Electrolyte First Aid Follow First Aid directions for contact with battery fluid. • External Contact: Flush with water. • Eyes: Flush with water for at least 15 minutes and get medical attention immediately! • Internal Contact: Drink large quantities of water. Follow with Milk of Magnesia, beaten egg or vegetable oil. Get medical attention immediately! In case of internal contact, DO NOT induce vomiting! IMPORTANT: DO NOT fast charge. Charging at a higher rate will damage or destroy battery. ONLY use an automatic charger designed for use with your battery. ALWAYS follow information provided on battery by battery manufacturer. Contact battery manufacturer for extensive instructions to charge battery. 1. Remove battery from unit. (See Removing the Battery on page 30) 2. Place battery on bench or other wellventilated place. 3. Connect positive (+) lead of charger to positive (+) terminal, and negative (-) lead to negative (-) terminal. 4. Charge battery according to charger and battery manufacturer's instructions. 5. Replace battery. (See Installing the Battery on page 30) Jump-Starting Ariens does not recommend jump-starting your unit. Jump-starting can damage engine and electrical system components. See your engine manual for more detailed information. Replacing Fuses IMPORTANT: Avoid damage to the electrical circuit. Use only the same size fuse as was originally installed. There are two fuses on your Ariens mower. They are located on the frame on the inside. One is close to the front of the fuel tank. The second is located to the rear of the tank. Both are 20 amp fuses. 1. Remove the defective fuse from the socket. 2. Check the metal clip in the fuse window and discard the fuse if it is broken. 3. Install the new fuse in its socket. CASTERS Servicing the Caster Wheel Roller Bearings 1. Park the unit on a level service, put the steering control levers in the park position, turn off the engine and remove the key. 2. Raise the front of the power unit and support it with jack stands. 3. Remove the lock nut, bolt and wheel assembly from the wheel fork assembly. 4. Remove the bushing caps, bearings and the spacer tube from the wheel assembly. 5. Clean and inspect the bearings and pack with clean grease. Replace bearings as needed. 6. Install the spacer tube, bearings, and new bushing caps. GB - 31
-
 1
1 -
2
-
3
-
4
-
5
-
6
-
7
-
8
-
9
-
10
-
11
-
12
-
13
-
14
-
15
-
16
-
17
-
18
-
19
-
20
-
21
-
22
-
23
-
24
-
25
-
 26
26 -
 27
27 -
 28
28 -
 29
29 -
 30
30 -
 31
31 -
 32
32 -
 33
33 -
 34
34 -
 35
35 -
 36
36 -
37
-
38
-
39
-
40
-
41
-
42
-
43
-
44
-
45
-
46
-
47
-
48
-
49
-
50
 |
 |
