Asko D1706 User manual Use & Care Guide General EN (English version) - Page 7

Overfill Pr, Verfill Pr, Verfill Protection, Tection, Energy Sa, Gy Sa, Gy Saving, Ving Tips - filter

Page 7 highlights

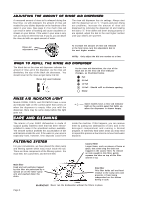
CLEANING THE FILTERS In hard water areas, it may be necessary to clean chemical buildup from the filters every 12 to 18 months. To do this, remove the coarse filter by squeezing the CLEANING THE DOOR To clean the edge around the door, use only a soft warm, damp rag. To prevent penetration of water into the door lock and electrical components, do not use a spray cleaner of any kind. Also, never use abrasive cleaners or scouring pads on the outer surfaces because they will scratch the finish. Some papers towels can also scratch or leave marks on the surface. tabs and lifting it out. Next, unscrew the fine filter and lift it and the main filter out. Wash all three filters gently in hot, soapy water and rinse them thoroughly. WARNING! Never use a spray cleaner of any kind on the door panel. You could damage the door lock and electrical components. And never use abrasive cleaners or scouring pads on the outer surfaces because they will scratch the finish. Also, some paper towels can scratch or leave marks on the stainless steel surface. CLEANING THE SPRAY ARMS Spray-arm jets and bearings may sometimes become clogged with hard water chemicals. To remove the spray arms, screw off the nut and take off the washer on top of CLEANING THE DRAIN PUMP On occasion something may get through the filters and into the drain pump. The drain pumps on ASKO dishwashers are designed to automatically reverse if anything should get caught in the propellers, thus ejecting the item back into the sump area or down the drain. Should you need to remove an obstacle from the drain, first turn the power off then remove the filters (as explained on page 6). Next, lift out the small black insert from the sump area. (You might want to remove any standing water first.) You can then look into the sump area for the item causing the obstruction. Should you find something, simply scoop it out. Be sure to replace the black insert before you put the filters back in. WARNING! Never run the dishwasher without the filters in place. the spray arm and lift off the arm. Wash the spray arms in warm, soapy water. Use a soft brush to clean the jets. Rinse thoroughly and replace. To reach an item caught in the drain pump, remove the filters then the small black insert in the sump area. OVERFILL PROTECTION Your ASKO dishwasher has an overfill protection device that automatically shuts off the inlet valve and starts the drain pump if the water level in the unit should rise above the normal level. If this happens, turn the water off at the main supply and call for service. If there is water in the base pan due to an overfill or small leak, the water must be removed before the dishwasher will start. OVERFILL PROTECTION ON OUR ELECTRONIC MODELS When an overfill is detected on Models D1776, D1796FI, D1876, D1996, D1976, and D1976CUS, all of the indicator lights on the control panel will flash at once. On Models D1776, D1876, D1976 and D1976CUS, the LED window will also display a fault code (F2). ENERGY SAVING TIPS ♦ If you plan to wash the dishes right away, there's no need to pre-rinse. Simply scrape off large particles and load the dishes. ♦ Wash only full loads. ♦ Use the Pan program only for heavily soiled dishes. ♦ Don't use the Temp boost for lightly soiled dishes. ♦ Avoid using Heat dry. (You can speed up the drying process by opening the door slightly to release the moist air.) Page 7

  • 1
  • 2
  • 3
  • 4
  • 5
  • 6
  • 7
  • 8
  • 9
  • 10
  • 11
  • 12

Page 7
On occasion something may get through the filters and
into the drain pump. The drain pumps on ASKO
dishwashers are designed to automatically reverse if
anything should get caught in the propellers, thus
ejecting the item back into the sump area or down the
drain. Should you need to remove an obstacle from the
drain, first turn the power off then remove the filters (as
explained on page 6). Next, lift out the small black
insert
from the sump area. (You might want to remove any
standing water first.) You can then look into the sump
area for the item causing the obstruction. Should you
find something, simply scoop it out. Be sure to replace
the black insert before you put the filters back in.
Spray-arm jets and bearings may sometimes become
clogged with hard water chemicals. To remove the spray
arms, screw off the nut and take off the washer on top of
CLEANING THE DOOR
CLEANING THE DOOR
CLEANING THE DOOR
CLEANING THE DOOR
CLEANING THE DOOR
To reach an item caught in the drain pump, remove
the filters then the small black insert in the sump
area.
Your ASKO dishwasher has an overfill protection device
that automatically shuts off the inlet valve and starts the
drain pump if the water level in the unit should rise above
the normal level. If this happens, turn the water off at the
main supply and call for service.
the spray arm and lift off the arm. Wash the spray arms
in warm, soapy water. Use a soft brush to clean the jets.
Rinse thoroughly
and replace.
OVERFILL PR
VERFILL PR
VERFILL PR
VERFILL PR
VERFILL PROTECTION
TECTION
TECTION
TECTION
TECTION
OVERFILL PR
OVERFILL PR
OVERFILL PR
OVERFILL PR
OVERFILL PROTECTION ON OUR ELECTR
TECTION ON OUR ELECTR
TECTION ON OUR ELECTRONIC MODELS
ONIC MODELS
ONIC MODELS
ONIC MODELS
ONIC MODELS
If there is water in the base pan due to an overfill or
small leak, the water must be removed before the
dishwasher will start.
When an overfill is detected on Models D1776, D1796FI,
D1876, D1996, D1976, and D1976CUS,
all of the
indicator lights on the control panel will flash at once.
ENER
ENER
ENER
ENER
ENERGY SA
GY SA
GY SA
GY SA
GY SAVING
VING
VING
VING
VING TIPS
TIPS
TIPS
TIPS
TIPS
If you plan to wash the dishes right away, there’s no
need to pre-rinse. Simply scrape off large particles
and load the dishes.
Wash only full loads.
Use the Pan program only for heavily soiled dishes.
Don’t use the Temp boost for lightly soiled dishes.
Avoid using Heat dry. (You can speed up the drying
process by opening the door slightly to release the
moist air.)
CLEANING
CLEANING
CLEANING
CLEANING
CLEANING THE FIL
THE FIL
THE FIL
THE FIL
THE FILTERS
TERS
TERS
TERS
TERS
In hard water areas, it may be necessary to clean
chemical buildup from the filters every 12 to 18 months.
To do this, remove the coarse filter by squeezing the
tabs and lifting it out. Next, unscrew the fine filter and lift
it and the main filter out. Wash all three filters gently in
hot, soapy water and rinse them thoroughly.
To clean the edge around the door, use only a soft warm,
damp rag. To prevent penetration of water into the door
lock and electrical components,
do not use a spray
cleaner of any kind
.
Also, never use abrasive cleaners or scouring pads on
the outer surfaces because they will scratch the finish.
Some papers towels can also scratch or leave marks
on the surface.
CLEANING
CLEANING
CLEANING
CLEANING
CLEANING THE SPRA
THE SPRA
THE SPRA
THE SPRA
THE SPRAY
Y
Y
Y
Y ARMS
ARMS
ARMS
ARMS
ARMS
CLEANING THE DRAIN PUMP
On Models D1776, D1876, D1976 and D1976CUS, the
LED window will also display a fault code (
F2
).
Never run the dishwasher without the filters in place.
WARNING!
Never use a spray cleaner of any kind on
the door panel. You could damage the
door lock and electrical
components. And never use
abrasive cleaners or scouring pads
on the outer surfaces because
they will scratch the finish. Also,
some paper towels can scratch
or leave marks on the stainless
steel surface.
WARNING!