Asko T702C User manual Use & Care Guide Asko T702C EN - Page 20
WARNING, Caution - dryer not drying
 |
View all Asko T702C manuals
Add to My Manuals
Save this manual to your list of manuals |
Page 20 highlights
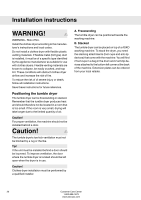
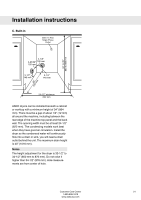
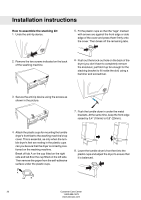
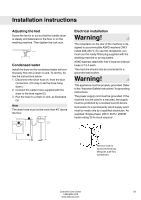
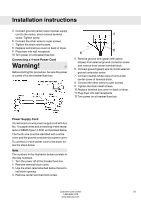
Installation instructions WARNING! WARNING - Risk of fire. Install the clothes dryer according to the manufacturer's instructions and local codes. Do not install a clothes dryer with flexible plastic venting materials. If flexible metal (foil type) duct is installed, it must be of a specific type identified by the applience manufacturer as suitable for use with clothes dryers. Flexible venting materials are known to collapse, be easily crushed, and trap lint. These conditions will obstruct clothes dryer airflow and increase the risk of fire. To reduce the risk of of severe injury or death, follow all installation instructions. Save these instructions for future reference. Positioning the tumble dryer The tumble dryer can be freestanding or stacked. Remember that the tumble dryer produces heat and should therefore not be located in a room that is too small. If the room is very small, drying will take longer due to the limited quantity of air. Caution! For proper ventilation, the machine should not be installed behind a door. Caution! The tumble dryer's toe kick ventilation must not be blocked by a rug or the like. Tip! If the unit must be installed behind a door should be louvered. To improve ventilation, the door where the tumble dryer is located should be left open when the dryer is in use. Caution! Clothes dryer installation must be performed by a qualified installer. A. Freestanding The tumble dryer can be positioned beside the washing machine. B. Stacked The tumble dryer can be placed on top of a ASKO washing machine. To stack the dryer, you need the stacking attachments (foot cups and anti-tip devices) that come with the machine: You will find 2 foot cups in a bag in the drum and 2 anti-tip devices attached to the bottom left corner at the back of the machine. Extension plates can be ordered from your local retailer. 20 Customer Care Center 1-800-898-1879 www.askousa.com
-
 1
1 -
2
-
3
-
4
-
5
-
6
-
7
-
8
-
9
-
10
-
11
-
12
-
13
-
14
-
 15
15 -
 16
16 -
 17
17 -
 18
18 -
 19
19 -
 20
20 -
 21
21 -
 22
22 -
 23
23 -
 24
24 -
 25
25 -
26
-
27
-
28
 |
 |
