Asus A7G A7 Hardware User''s Manual for English Edition (E2343) - Page 39
Inserting a PC Card or ExpressCard, Removing a PC Card, Removing an ExpressCard
 |
View all Asus A7G manuals
Add to My Manuals
Save this manual to your list of manuals |
Page 39 highlights
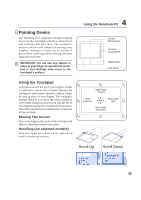
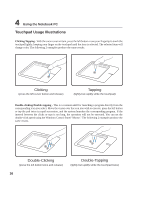
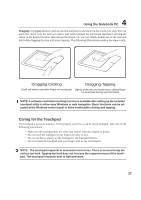
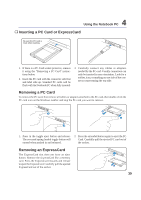
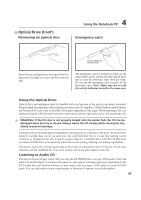
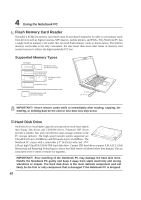
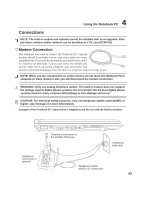
4 Using the Notebook PC Inserting a PC Card or ExpressCard Be sure the PC card is level when inserting. 1. If there is a PC Card socket protector, remove it using the "Removing a PC Card" instructions below. 2. Insert the PC card with the connector side first and label side up. Standard PC cards will be flush with the Notebook PC when fully inserted. 3. Carefully connect any cables or adapters needed by the PC card. Usually connectors can only be inserted in one orientation. Look for a sticker, icon, or marking on one side of the connector representing the top side. Removing a PC Card To remove the PC card, first remove all cables or adapters attached to the PC card, then double-click the PC card icon on the Windows taskbar and stop the PC card you want to remove. 1 2 2 1 1. Press in the toggle eject button and release. The recessed spring loaded toggle button will extend when pushed in and released. 2. Press the extended button again to eject the PC Card. Carefully pull the ejected PC card out of the socket. Removing an ExpressCard The ExpressCard slot does not have an eject button. Remove the ExpressCard like a memory card. Press the ExpressCard inwards and release to eject the ExpressCard. Carefully pull the ejected ExpressCard out of the socket. 1 2 39
-
 1
1 -
2
-
3
-
4
-
5
-
6
-
7
-
8
-
9
-
10
-
11
-
12
-
13
-
14
-
15
-
16
-
17
-
18
-
19
-
20
-
21
-
22
-
23
-
24
-
25
-
26
-
27
-
28
-
29
-
30
-
31
-
32
-
33
-
 34
34 -
 35
35 -
 36
36 -
 37
37 -
 38
38 -
 39
39 -
 40
40 -
 41
41 -
 42
42 -
 43
43 -
 44
44 -
45
-
46
-
47
-
48
-
49
-
50
-
51
-
52
-
53
-
54
-
55
-
56
-
57
-
58
-
59
-
60
-
61
-
62
-
63
-
64
-
65
-
66
-
67
-
68
-
69
-
70
-
71
-
72
-
73
-
74
-
75
-
76
 |
 |
