Asus BRT-AC828 users manual in English - Page 47
IP Pool Starting Address
 |
View all Asus BRT-AC828 manuals
Add to My Manuals
Save this manual to your list of manuals |
Page 47 highlights
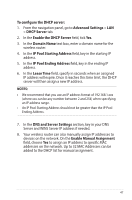
To configure the DHCP server: 1. From the navigation panel, go to Advanced Settings > LAN > DHCP Server tab. 2. In the Enable the DHCP Server field, tick Yes. 3. In the Domain Name text box, enter a domain name for the wireless router. 4. In the IP Pool Starting Address field, key in the starting IP address. 5. In the IP Pool Ending Address field, key in the ending IP address. 6. In the Lease Time field, specify in seconds when an assigned IP address will expire. Once it reaches this time limit, the DHCP server will then assign a new IP address. NOTES: • We recommend that you use an IP address format of 192.168.1.xxx (where xxx can be any number between 2 and 254) when specifying an IP address range. • An IP Pool Starting Address should not be greater than the IP Pool Ending Address. 7. In the DNS and Server Settings section, key in your DNS Server and WINS Server IP address if needed. 8. Your wireless router can also manually assign IP addresses to devices on the network. On the Enable Manual Assignment field, choose Yes to assign an IP address to specific MAC addresses on the network. Up to 32 MAC Addresses can be added to the DHCP list for manual assignment. 47
-
 1
1 -
2
-
3
-
4
-
5
-
6
-
7
-
8
-
9
-
10
-
11
-
12
-
13
-
14
-
15
-
16
-
17
-
18
-
19
-
20
-
21
-
22
-
23
-
24
-
25
-
26
-
27
-
28
-
29
-
30
-
31
-
32
-
33
-
34
-
35
-
36
-
37
-
38
-
39
-
40
-
41
-
 42
42 -
 43
43 -
 44
44 -
 45
45 -
 46
46 -
 47
47 -
 48
48 -
 49
49 -
 50
50 -
 51
51 -
 52
52 -
53
-
54
-
55
-
56
-
57
-
58
-
59
-
60
-
61
-
62
-
63
-
64
-
65
-
66
-
67
-
68
-
69
-
70
-
71
-
72
-
73
-
74
-
75
-
76
-
77
-
78
-
79
-
80
-
81
-
82
-
83
-
84
-
85
-
86
-
87
-
88
-
89
-
90
-
91
-
92
-
93
-
94
-
95
-
96
-
97
-
98
-
99
-
100
-
101
-
102
-
103
-
104
 |
 |
