Asus CM6650 User Manual - Page 11
Rear panel, Memory Stick™ / Memory Stick Pro™ card slot.
 |
View all Asus CM6650 manuals
Add to My Manuals
Save this manual to your list of manuals |
Page 11 highlights
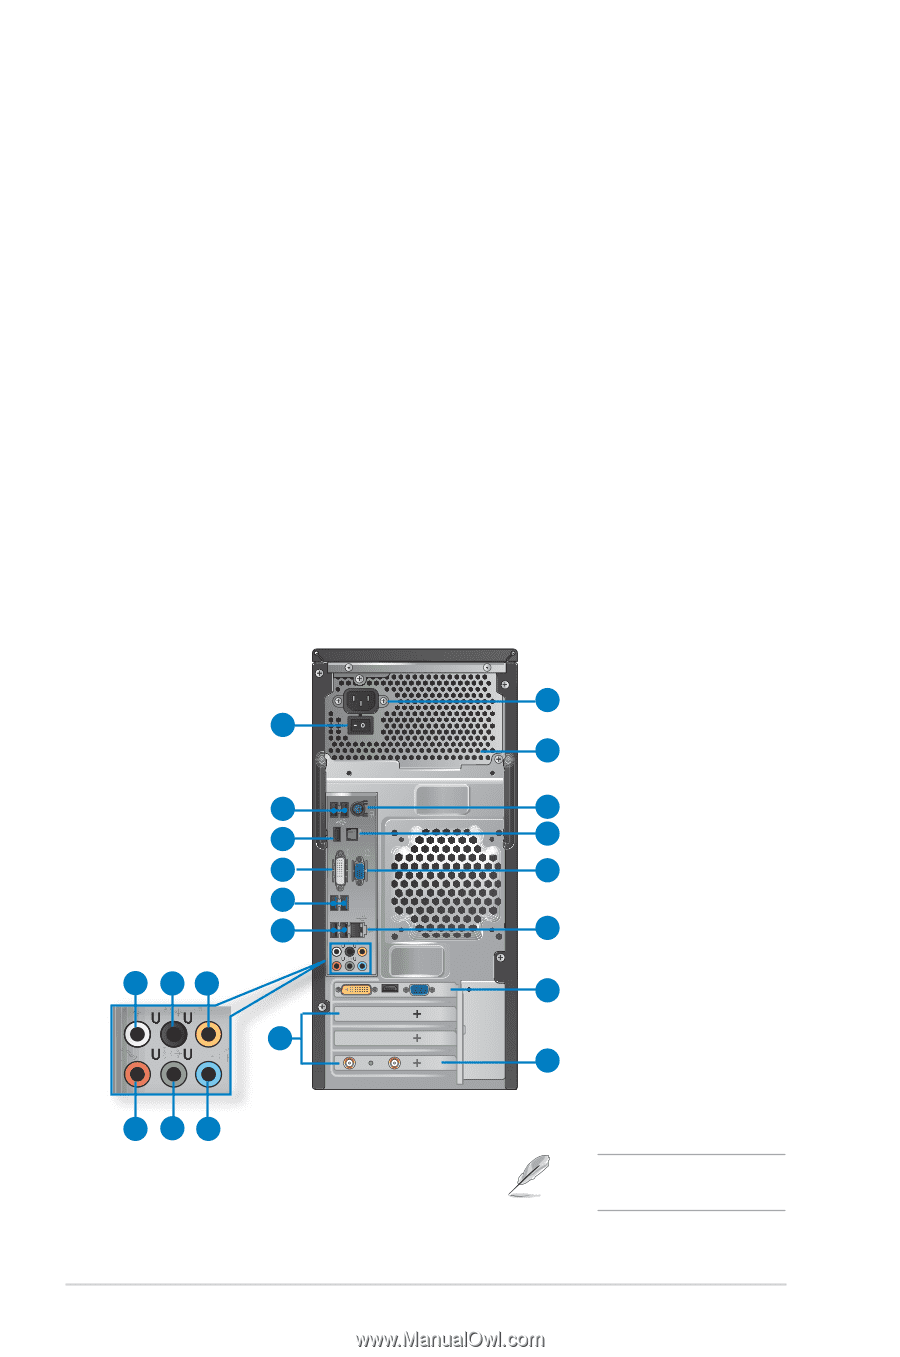
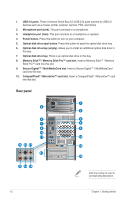
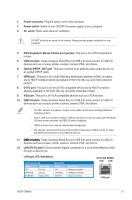
1. USB 2.0 ports. These Universal Serial Bus 2.0 (USB 2.0) ports connect to USB 2.0 devices such as a mouse, printer, scanner, camera, PDA, and others. 2. Microphone port (pink). This port connects to a microphone. 3. Headphone port (lime). This port connects to a headphone or speaker. 4. Power button. Press this button to turn on your computer. 5. Optical disk drive eject button. Press this button to eject the optical disk drive tray. 6. Optical disk drive bay (empty). Allows you to install an additional optical disk drive in this bay. 7. Optical disk drive bay. There is an optical disk drive in this bay. 8. Memory Stick™ / Memory Stick Pro™ card slot. Insert a Memory Stick™ / Memory Stick Pro™ card into this slot. 9. Secure Digital™ / MultiMediaCard slot. Insert a Secure Digital™ / MultiMediaCard card into this slot. 10. CompactFlash® / Microdrive™ card slot. Insert a CompactFlash® / Microdrive™ card into this slot. Rear panel 2 5 7 8 10 11 14 13 17 21 15 16 18 1 3 4 6 9 12 19 20 Click the number to view its corresponding description. 1-2 Chapter 1: Getting started
-
 1
1 -
2
-
3
-
4
-
5
-
 6
6 -
 7
7 -
 8
8 -
 9
9 -
 10
10 -
 11
11 -
 12
12 -
 13
13 -
 14
14 -
 15
15 -
 16
16 -
17
-
18
-
19
-
20
-
21
-
22
-
23
-
24
-
25
-
26
-
27
-
28
-
29
-
30
-
31
-
32
-
33
-
34
-
35
-
36
-
37
-
38
-
39
-
40
-
41
-
42
-
43
-
44
-
45
-
46
-
47
-
48
-
49
-
50
-
51
-
52
-
53
-
54
-
55
-
56
-
57
-
58
-
59
-
60
-
61
-
62
-
63
-
64
-
65
-
66
-
67
-
68
-
69
-
70
-
71
-
72
-
73
-
74
-
75
-
76
-
77
-
78
 |
 |