Asus CROSSHAIR IV EXTREME User Guide - Page 156
Installing the RAID driver during Windows, installation, Using a USB floppy disk drive
 |
View all Asus CROSSHAIR IV EXTREME manuals
Add to My Manuals
Save this manual to your list of manuals |
Page 156 highlights
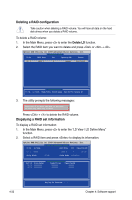
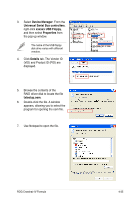
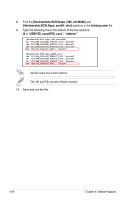
4.5.3 Installing the RAID driver during Windows® OS installation If you use a SATA optical drive to run the OS installation disk, we strongly recommend that you install the optical dirve to the SATA connectors 5/6 and set them to [IDE] mode. To install the RAID driver for Windows® XP 1. During the OS installation, the system prompts you to press the F6 key to install third-party SCSI or RAID driver. 2. Press , and then insert the floppy disk with RAID driver into the USB floppy disk drive. 3. When prompted to select the SCSI adapter to install, select the RAID driver for the corresponding OS version. 4. Follow the succeeding screen instructions to complete the installation. To install the RAID driver for Windows® Vista or later OS 1. During the OS installation, click Load Driver to allow you to select the installation media containing the RAID driver. 2. Insert the USB flash drive with RAID driver into the USB port or the support DVD into the optical drive, and then click Browse. 3. Click the name of the device you've inserted, go to Drivers > RAID, and then select the RAID driver for the corresponding OS version. Click OK. 4. Follow the succeeding screen instructions to complete the installation. Before loading the RAID driver from a USB flash drive, you have to use another computer to copy the RAID driver from the support DVD to the USB flash drive. 4.5.4 Using a USB floppy disk drive Due to OS limitation, Windows® XP may not recognize the USB floppy disk drive when you install the RAID driver from a floppy disk during the OS installation. To solve this issue, add the USB floppy disk drive's Vendor ID (VID) and Product ID (PID) to the floppy disk containing the RAID driver. Refer to the steps below: 1. Using another computer, plug the USB floppy disk drive, and insert the floppy disk containing the RAID driver. 2. Right-click My Computer on the Windows® desktop or start menu, and then select Manage from the pop-up window. or 4-34 Chapter 4: Software support
-
 1
1 -
2
-
3
-
4
-
5
-
6
-
7
-
8
-
9
-
10
-
11
-
12
-
13
-
14
-
15
-
16
-
17
-
18
-
19
-
20
-
21
-
22
-
23
-
24
-
25
-
26
-
27
-
28
-
29
-
30
-
31
-
32
-
33
-
34
-
35
-
36
-
37
-
38
-
39
-
40
-
41
-
42
-
43
-
44
-
45
-
46
-
47
-
48
-
49
-
50
-
51
-
52
-
53
-
54
-
55
-
56
-
57
-
58
-
59
-
60
-
61
-
62
-
63
-
64
-
65
-
66
-
67
-
68
-
69
-
70
-
71
-
72
-
73
-
74
-
75
-
76
-
77
-
78
-
79
-
80
-
81
-
82
-
83
-
84
-
85
-
86
-
87
-
88
-
89
-
90
-
91
-
92
-
93
-
94
-
95
-
96
-
97
-
98
-
99
-
100
-
101
-
102
-
103
-
104
-
105
-
106
-
107
-
108
-
109
-
110
-
111
-
112
-
113
-
114
-
115
-
116
-
117
-
118
-
119
-
120
-
121
-
122
-
123
-
124
-
125
-
126
-
127
-
128
-
129
-
130
-
131
-
132
-
133
-
134
-
135
-
136
-
137
-
138
-
139
-
140
-
141
-
142
-
143
-
144
-
145
-
146
-
147
-
148
-
149
-
150
-
 151
151 -
 152
152 -
 153
153 -
 154
154 -
 155
155 -
 156
156 -
 157
157 -
 158
158 -
 159
159 -
 160
160 -
 161
161 -
162
-
163
-
164
-
165
-
166
-
167
-
168
-
169
-
170
-
171
-
172
 |
 |
