Asus EB1035 User's Manual for English Edition - Page 17
secured in the VESA mount, press the lever switch at the bottom
 |
View all Asus EB1035 manuals
Add to My Manuals
Save this manual to your list of manuals |
Page 17 highlights
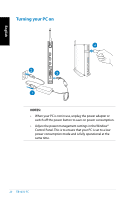
English 3. The VESA mount is designed for you to rotate the PC so to use the front and rear I/O ports at convenient angles. To turn the PC secured in the VESA mount, press the lever switch at the bottom of the VESA mount to unlock the wheel. Then turn according to preference. 3 1 2 IMPORTANT! • Set the rotation wheel upright when the system is in use. • Please take note of the cables connected to the PC while operating the rotation wheel. To prevent hazards from loosened cables, the wheel is designed to rotate no more than 90° clock/ counterclock-wise. EB1035 PC 17
-
 1
1 -
2
-
3
-
4
-
5
-
6
-
7
-
8
-
9
-
10
-
11
-
 12
12 -
 13
13 -
 14
14 -
 15
15 -
 16
16 -
 17
17 -
 18
18 -
 19
19 -
 20
20 -
 21
21 -
 22
22 -
23
-
24
-
25
-
26
-
27
-
28
-
29
-
30
-
31
-
32
-
33
-
34
-
35
-
36
-
37
-
38
-
39
-
40
-
41
-
42
-
43
-
44
-
45
-
46
-
47
-
48
-
49
-
50
-
51
-
52
-
53
-
54
-
55
-
56
-
57
-
58
-
59
-
60
-
61
 |
 |

EB1035 PC
17
English
3.
The VESA mount is designed for you to rotate the PC so to use
the front and rear I/O ports at convenient angles. To turn the PC
secured in the VESA mount, press the lever switch at the bottom
of the VESA mount to unlock the wheel. Then turn according to
preference.
1
2
3
IMPORTANT!
•
Set the rotation wheel upright when the system is in use.
•
Please take note of the cables connected to the PC while
operating the rotation wheel. To prevent hazards from
loosened cables, the wheel is designed to rotate no more
than 90° clock/ counterclock-wise.