Asus ET1611PUK User Manual - Page 23
English, removed in the previous step noting
 |
View all Asus ET1611PUK manuals
Add to My Manuals
Save this manual to your list of manuals |
Page 23 highlights
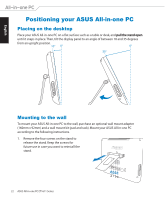
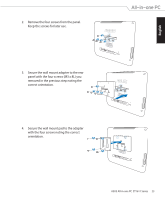
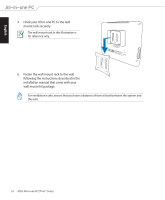
English 2. Remove the four screws from the panel. Keep the screws for later use. 3. Secure the wall mount adapter to the rear panel with the four screws (M3 x 8L) you removed in the previous step noting the correct orientation. 4. Secure the wall mount pad to the adapter with the four screws noting the correct orientation. ASUS All-in-one PC ET1611 Series 23
-
 1
1 -
2
-
3
-
4
-
5
-
6
-
7
-
8
-
9
-
10
-
11
-
12
-
13
-
14
-
15
-
16
-
17
-
 18
18 -
 19
19 -
 20
20 -
 21
21 -
 22
22 -
 23
23 -
 24
24 -
 25
25 -
 26
26 -
 27
27 -
 28
28 -
29
-
30
-
31
-
32
-
33
-
34
-
35
-
36
-
37
-
38
 |
 |

English
23
ASUS All-in-one PC
ET1611 Series
2.
Remove the four screws from the panel.
Keep the screws for later use.
3.
Secure the wall mount adapter to the rear
panel with the four screws (M3 x 8L) you
removed in the previous step noting the
correct orientation.
4.
Secure the wall mount pad to the adapter
with the four screws noting the correct
orientation.