Asus F7Kr User Manual - Page 19
Rear Side, Battery Pack, Power DC Input, USB Port 2.0/1.1, Air Vents - series
 |
View all Asus F7Kr manuals
Add to My Manuals
Save this manual to your list of manuals |
Page 19 highlights
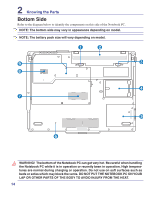
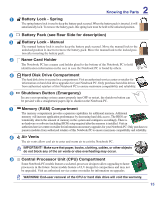
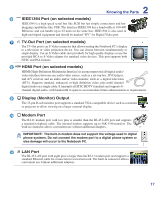
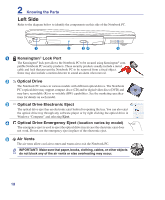
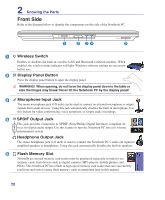
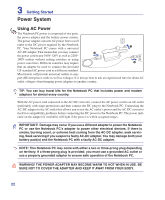
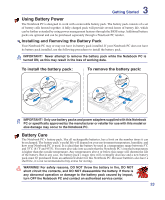
2 Knowing the Parts Rear Side Refer to the diagram below to identify the components on this side of the Notebook PC. 1 2 3 4 1 Power (DC) Input The supplied power adapter converts AC power to DC power for use with this jack. Power sup- plied through this jack supplies power to the Notebook PC and charges the internal battery pack. To prevent damage to the Notebook PC and battery pack, always use the supplied power adapter. CAUTION: MAY BECOME WARM TO HOT WHEN IN USE. BE SURE NOT TO COVER THE ADAPTER AND KEEP IT AWAY FROM YOUR BODY. 2 Air Vents The air vents allow cool air to enter and warm air to exit the Notebook PC. IMPORTANT! Make sure that paper, books, clothing, cables, or other objects do not block any of the air vents or else overheating may occur. 3 2.0 USB Port (2.0/1.1) The USB (Universal Serial Bus) port is compatible with USB 2.0 or USB 1.1 devices such as keyboards, pointing devices, cameras, hard disk drives, printers, and scanners connected in a series up to 12Mbits/sec (USB 1.1) and 480Mbits/sec (USB 2.0). USB allows many devices to run simultaneously on a single computer, with some peripherals acting as additional plug-in sites or hubs. USB supports hot-swapping of devices so that most peripherals can be connected or disconnected without restarting the computer. 4 Battery Pack The battery pack is automatically charged when the Notebook PC is connected to an AC power source and maintains power to the Notebook PC when AC power is not connected. This allows use when moving temporarily between locations. Battery time varies by usage and by the specifications for this Notebook PC. The battery pack cannot be disassembled and must be purchased as a single unit. 19
-
 1
1 -
2
-
3
-
4
-
5
-
6
-
7
-
8
-
9
-
10
-
11
-
12
-
13
-
 14
14 -
 15
15 -
 16
16 -
 17
17 -
 18
18 -
 19
19 -
 20
20 -
 21
21 -
 22
22 -
 23
23 -
 24
24 -
25
-
26
-
27
-
28
-
29
-
30
-
31
-
32
-
33
-
34
-
35
-
36
-
37
-
38
-
39
-
40
-
41
-
42
-
43
-
44
-
45
-
46
-
47
-
48
-
49
-
50
-
51
-
52
-
53
-
54
-
55
-
56
-
57
-
58
-
59
-
60
-
61
-
62
-
63
-
64
-
65
-
66
-
67
-
68
-
69
-
70
-
71
-
72
-
73
-
74
-
75
-
76
-
77
-
78
-
79
-
80
-
81
-
82
-
83
-
84
-
85
-
86
-
87
 |
 |
