Asus L84C L8400 Series User Manual (English Version) - Page 16
Front Side
 |
View all Asus L84C manuals
Add to My Manuals
Save this manual to your list of manuals |
Page 16 highlights
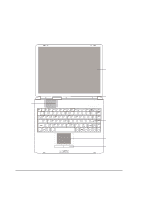
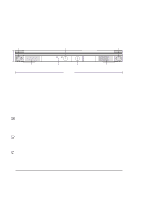
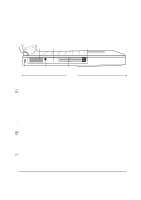
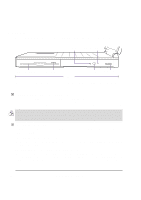
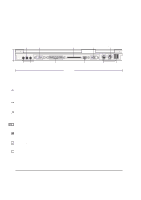
Front Side Refer to the diagram below to identify the components on the front side of the Notebook PC. Display Panel Latch Power Indicator Display Panel Latch 35mm Stereo Speaker Charge Indicator Power Switch 310mm Stereo Speaker The following describes the front components of the Notebook PC as shown by the picture above. Stereo Speakers The two built-in speakers allow you to hear stereo audio without additional attachments. The multimedia sound system features an integrated digital audio controller that produces rich, vibrant sound in high quality 16-bit stereo. With a pair of integrated stereo speakers, a built-in microphone, and both input and output audio jacks for external audio devices, the Notebook PC fulfills most multimedia computing needs. All audio features are software controlled. Display Panel Latch The display latch is used to lock the display panel in the closed position. Slide the latch to the left to release the display panel. Charge Indicator Indicates that the battery is being charged when ON and fully charged when OFF. This LED only lights when the power adapter is used. This LED will not light if there is no battery installed. Slow flash means the battery power is low and require charging. Quick flashing means that the battery pack cannot be charged and needs replacing. Power Indicator The green LED will light to indicate that the Notebook PC is turned ON and blink when the Notebook PC is in Suspend-To-RAM mode. This LED will be OFF when the Notebook PC is in Suspend-To-Disk mode. Power Switch The power switch allows powering ON and OFF the Notebook PC. The switch normally rests on the left and is activated when moved to the right and released.To prevent accidental turning OFF the power, it is designed to take longer to turn OFF than to turn ON the power. The momentary sliding switch requires about one second to turn ON the power and about two seconds to turn OFF the power. 16 2. Knowing the Parts
-
 1
1 -
2
-
3
-
4
-
5
-
6
-
7
-
8
-
9
-
10
-
 11
11 -
 12
12 -
 13
13 -
 14
14 -
 15
15 -
 16
16 -
 17
17 -
 18
18 -
 19
19 -
 20
20 -
 21
21 -
22
-
23
-
24
-
25
-
26
-
27
-
28
-
29
-
30
-
31
-
32
-
33
-
34
-
35
-
36
-
37
-
38
-
39
-
40
-
41
-
42
-
43
-
44
-
45
-
46
-
47
-
48
-
49
-
50
-
51
-
52
-
53
-
54
-
55
-
56
-
57
-
58
-
59
-
60
-
61
-
62
-
63
-
64
-
65
-
66
-
67
-
68
-
69
-
70
-
71
-
72
-
73
-
74
-
75
-
76
-
77
-
78
-
79
-
80
-
81
-
82
-
83
-
84
-
85
-
86
-
87
-
88
-
89
-
90
-
91
-
92
-
93
-
94
-
95
-
96
 |
 |
