Asus M3N72-T Deluxe User Manual - Page 167
NVIDIA, SLI™ technology
 |
View all Asus M3N72-T Deluxe manuals
Add to My Manuals
Save this manual to your list of manuals |
Page 167 highlights
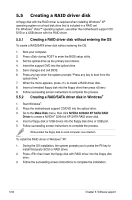
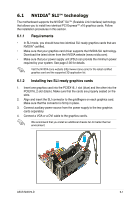
6.1 NVIDIA® SLI™ technology The motherboard supports the NVIDIA® SLI™ (Scalable Link Interface) technology that allows you to install two identical PCI Express™ x16 graphics cards. Follow the installation procedures in this section. 6.1.1 Requirements • In SLI mode, you should have two identical SLI-ready graphics cards that are NVIDIA® certified. • Make sure that your graphics card driver supports the NVIDIA SLI technology. Download the latest driver from the NVIDIA website (www.nvidia.com). • Make sure that your power supply unit (PSU) can provide the minimum power required by your system. See page 2-36 for details. Visit the NVIDIA zone website (http://www.nzone.com) for the latest certified graphics card and the supported 3D application list. 6.1.2 Installing two SLI-ready graphics cards 1. Insert one graphics card into the PCIEX16_1 slot (blue) and the other into the PCIEX16_2 slot (black). Make sure that the cards are properly seated on the slots. 2. Align and insert the SLI connector to the goldfingers on each graphics card. Make sure that the connector is firmly in place. 3. Connect auxiliary power source from the power supply to the two graphics cards separately. 4. Connect a VGA or a DVI cable to the graphics card/s. We recommend that you install an additional chassis fan for better thermal environment. ASUS M3N72-D 6-1
-
 1
1 -
2
-
3
-
4
-
5
-
6
-
7
-
8
-
9
-
10
-
11
-
12
-
13
-
14
-
15
-
16
-
17
-
18
-
19
-
20
-
21
-
22
-
23
-
24
-
25
-
26
-
27
-
28
-
29
-
30
-
31
-
32
-
33
-
34
-
35
-
36
-
37
-
38
-
39
-
40
-
41
-
42
-
43
-
44
-
45
-
46
-
47
-
48
-
49
-
50
-
51
-
52
-
53
-
54
-
55
-
56
-
57
-
58
-
59
-
60
-
61
-
62
-
63
-
64
-
65
-
66
-
67
-
68
-
69
-
70
-
71
-
72
-
73
-
74
-
75
-
76
-
77
-
78
-
79
-
80
-
81
-
82
-
83
-
84
-
85
-
86
-
87
-
88
-
89
-
90
-
91
-
92
-
93
-
94
-
95
-
96
-
97
-
98
-
99
-
100
-
101
-
102
-
103
-
104
-
105
-
106
-
107
-
108
-
109
-
110
-
111
-
112
-
113
-
114
-
115
-
116
-
117
-
118
-
119
-
120
-
121
-
122
-
123
-
124
-
125
-
126
-
127
-
128
-
129
-
130
-
131
-
132
-
133
-
134
-
135
-
136
-
137
-
138
-
139
-
140
-
141
-
142
-
143
-
144
-
145
-
146
-
147
-
148
-
149
-
150
-
151
-
152
-
153
-
154
-
155
-
156
-
157
-
158
-
159
-
160
-
161
-
 162
162 -
 163
163 -
 164
164 -
 165
165 -
 166
166 -
 167
167 -
 168
168 -
 169
169 -
 170
170 -
 171
171 -
 172
172 -
173
-
174
 |
 |
