Asus M4A78-VM IN SI User Manual - Page 29
BIOS setup program
 |
View all Asus M4A78-VM IN SI manuals
Add to My Manuals
Save this manual to your list of manuals |
Page 29 highlights
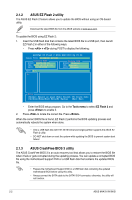
Recovering the BIOS To recover the BIOS: 1. Turn on the system. 2. Insert the Support DVD or USB flash disk containing the BIOS file to the optical disk drive or a USB port. The utility displays the following message and automatically checks the Support DVD or the USB flash disk for the BIOS file. Bad BIOS checksum. Starting BIOS recovery... Checking for CD-ROM... When the BIOS file is found, the utility reads it and starts erasing the corrupted BIOS file. Bad BIOS checksum. Starting BIOS recovery... Checking for CD-ROM... CD-ROM found! Reading file "M4A78VSI.ROM". Completed. Start Erasing... Start Programming... 3. Restart the system after the utility completes the updating process. • Only a USB flash disk with FAT 32/16 format and single partition supports ASUS CrashFree BIOS 3. The device size should be smaller than 8GB. • DO NOT shut down or reset the system while updating the BIOS! Doing so can cause system boot failure! The recovered BIOS may not be the latest BIOS version for this motherboard. Download the latest BIOS file from the ASUS website at www.asus.com. 2.2 BIOS setup program Use the BIOS Setup program when you are installing a motherboard, reconfiguring your system, or prompted to "Run Setup." This section explains how to configure your system using this utility. If you want to enter Setup after POST, reboot the system by doing any of the following procedures: • Restart using the OS standard shut-down procedure. • Press ++ simultaneously. • Press the reset button on the system chassis. • Press the power button to turn the system off then back on. Using the power button, reset button, or the ++ keys to force reset from a running operating system can cause damage to your data or system. We recommend that you always shut down the system properly from the operating system. Chapter 2: BIOS information 2-3
-
 1
1 -
2
-
3
-
4
-
5
-
6
-
7
-
8
-
9
-
10
-
11
-
12
-
13
-
14
-
15
-
16
-
17
-
18
-
19
-
20
-
21
-
22
-
23
-
 24
24 -
 25
25 -
 26
26 -
 27
27 -
 28
28 -
 29
29 -
 30
30 -
 31
31 -
 32
32 -
 33
33 -
 34
34 -
35
-
36
-
37
-
38
-
39
-
40
 |
 |