Asus P1-P5945GCX User Manual - Page 31
Install the storage drive assembly to the chassis.
 |
View all Asus P1-P5945GCX manuals
Add to My Manuals
Save this manual to your list of manuals |
Page 31 highlights
Follow these steps to reinstall the storage drive assembly: Before reinstalling the storage drive assembly, connect the IDE/SATA and power plugs to the IDE/SATA and power connectors at the back of the drives. 1. Connect the black plug of the IDE cable to the optical drive, then the gray plug to the hard disk drive. If you have the SATA HDD, connect the SATA cable to the SATA HD. 2. Connect the 4-pin power plugs to the power connectors at the back of the drives. 3. Install the storage drive assembly to the chassis. 3 R 4. Secure the storage drive assembly with three screws. R 4 ASUS P1/P2-P5945GCX 2-15
-
 1
1 -
2
-
3
-
4
-
5
-
6
-
7
-
8
-
9
-
10
-
11
-
12
-
13
-
14
-
15
-
16
-
17
-
18
-
19
-
20
-
21
-
22
-
23
-
24
-
25
-
 26
26 -
 27
27 -
 28
28 -
 29
29 -
 30
30 -
 31
31 -
 32
32 -
 33
33 -
 34
34 -
 35
35 -
 36
36 -
37
-
38
-
39
-
40
-
41
-
42
-
43
-
44
-
45
-
46
-
47
-
48
-
49
-
50
-
51
-
52
-
53
-
54
-
55
-
56
-
57
-
58
-
59
-
60
-
61
-
62
-
63
-
64
-
65
-
66
-
67
-
68
-
69
-
70
-
71
-
72
-
73
-
74
-
75
-
76
-
77
-
78
-
79
-
80
-
81
-
82
-
83
-
84
-
85
-
86
-
87
-
88
-
89
-
90
 |
 |

2-15
ASUS P1/P2-P5945GCX
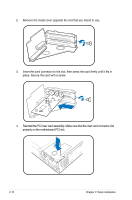
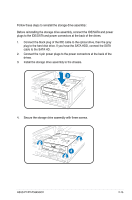
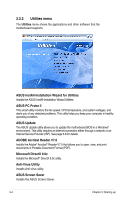
Before reinstalling the storage drive assembly, connect the IDE/SATA and power
plugs to the IDE/SATA and power connectors at the back of the drives.
1.
Connect the black plug of the IDE cable to the optical drive, then the gray
plug to the hard disk drive. If you have the SATA HDD, connect the SATA
cable to the SATA HD.
2.
Connect the 4-pin power plugs to the power connectors at the back of the
drives.
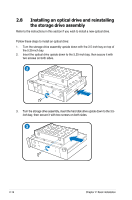
3.
Install the storage drive assembly to the chassis.
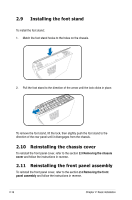
4.
Secure the storage drive assembly with three screws.
Follow these steps to reinstall the storage drive assembly:
3
4