Asus P4B-E P4B-E User Manual - Page 115
Personalized Boot Logo
 |
View all Asus P4B-E manuals
Add to My Manuals
Save this manual to your list of manuals |
Page 115 highlights
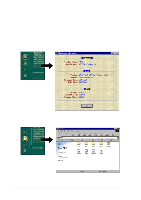
5.3.3 Personalized Boot Logo Also included in the support CD is a DOS version of ASUS MyLogo™. Locate the application called LOGO.EXE and a sample image library of boot screens in bitmap (BMP) format to install this feature. Back up your system BIOS to a bootable floppy disk before using LOGO.EXE to modify your boot screen. See section "4.1 Managing and updating your BIOS". Make sure that the item Full Screen Logo in BIOS is set to [Enabled]. 1. To set up a new Personalized Boot Logo, browse the Support CD and copy these three components to the windows directory: LOGO.EXE; AFLASH.EXE; one or more BMP files in 640 x 480 pixel, 16-color format. 2. Then go to the Shut Down Menu and select: "Restart in DOS Mode." From the DOS prompt, run AFLASH: C:\WINDOWS>AFLASH 3. In AFLASH, select [1] and save the existing system BIOS file with a new name, for example: CSCB1016.AWD. Exit AFLASH to DOS. 4. To set up a new boot screen, run LOGO from DOS. Both the BIOS file name and the BMP file name must follow in the command line: C:\WINDOWS>LOGO CSCB1016.AWD SEA2.BMP 5. Press to save the image with the BIOS file. 6. Run AFLASH again. Select [2] and flash the updated BIOS file, in this case, CSCB1016.AWD, to the ROM. 7. Reboot your computer by pressing . The new boot screen that you selected appears. If you wish to select a new BMP file, re-run the process from Step 4. You may wish to create an original boot image. Use your favorite photo editor to save an image as a 640 x 480 pixel, 16-color BMP file. Choose a file name for the image with eight digits and characters recognizable in the DOS environment. Make sure to place the .BMP files in the same directory as the BIOS file and LOGO.EXE. ASUS P4B-E motherboard user guide 5-13
-
 1
1 -
2
-
3
-
4
-
5
-
6
-
7
-
8
-
9
-
10
-
11
-
12
-
13
-
14
-
15
-
16
-
17
-
18
-
19
-
20
-
21
-
22
-
23
-
24
-
25
-
26
-
27
-
28
-
29
-
30
-
31
-
32
-
33
-
34
-
35
-
36
-
37
-
38
-
39
-
40
-
41
-
42
-
43
-
44
-
45
-
46
-
47
-
48
-
49
-
50
-
51
-
52
-
53
-
54
-
55
-
56
-
57
-
58
-
59
-
60
-
61
-
62
-
63
-
64
-
65
-
66
-
67
-
68
-
69
-
70
-
71
-
72
-
73
-
74
-
75
-
76
-
77
-
78
-
79
-
80
-
81
-
82
-
83
-
84
-
85
-
86
-
87
-
88
-
89
-
90
-
91
-
92
-
93
-
94
-
95
-
96
-
97
-
98
-
99
-
100
-
101
-
102
-
103
-
104
-
105
-
106
-
107
-
108
-
109
-
 110
110 -
 111
111 -
 112
112 -
 113
113 -
 114
114 -
 115
115 -
 116
116 -
 117
117 -
 118
118 -
 119
119 -
 120
120 -
121
-
122
-
123
-
124
-
125
-
126
-
127
-
128
 |
 |
